 Loopy Panda
Retro Goose in Overalls: Goose Amigurumi Pattern
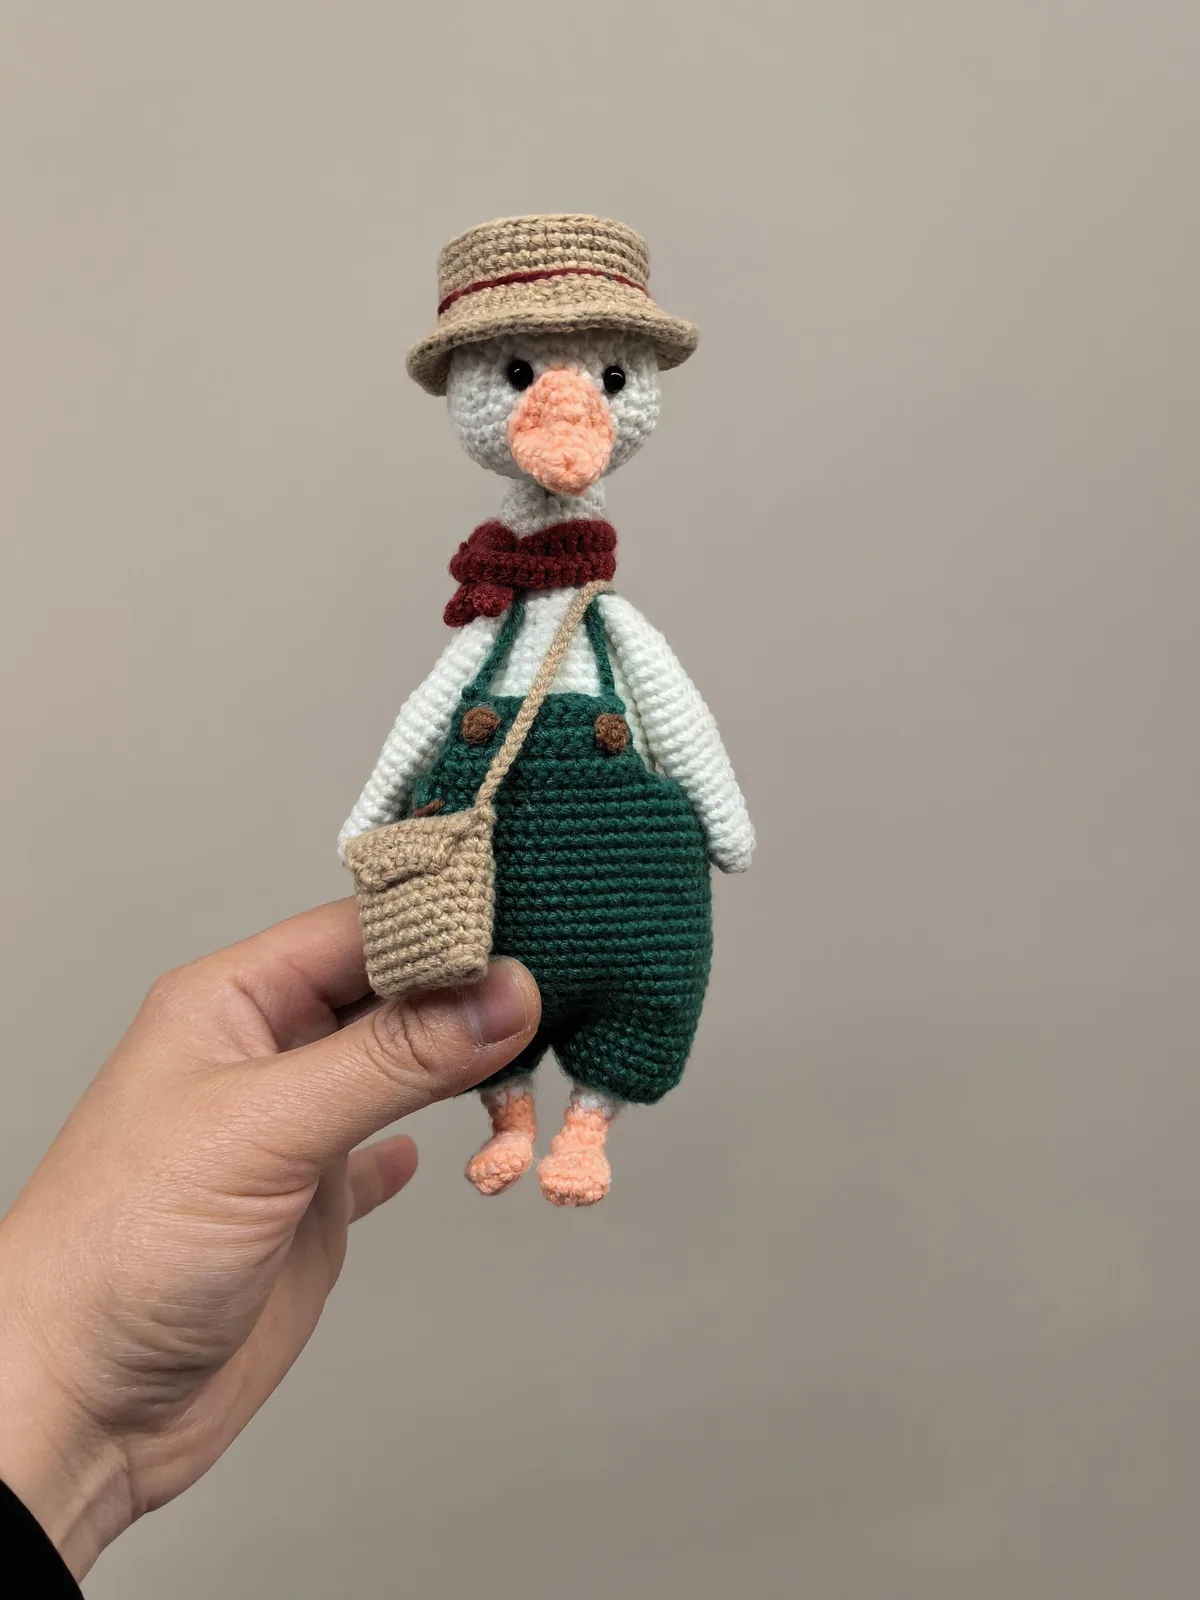
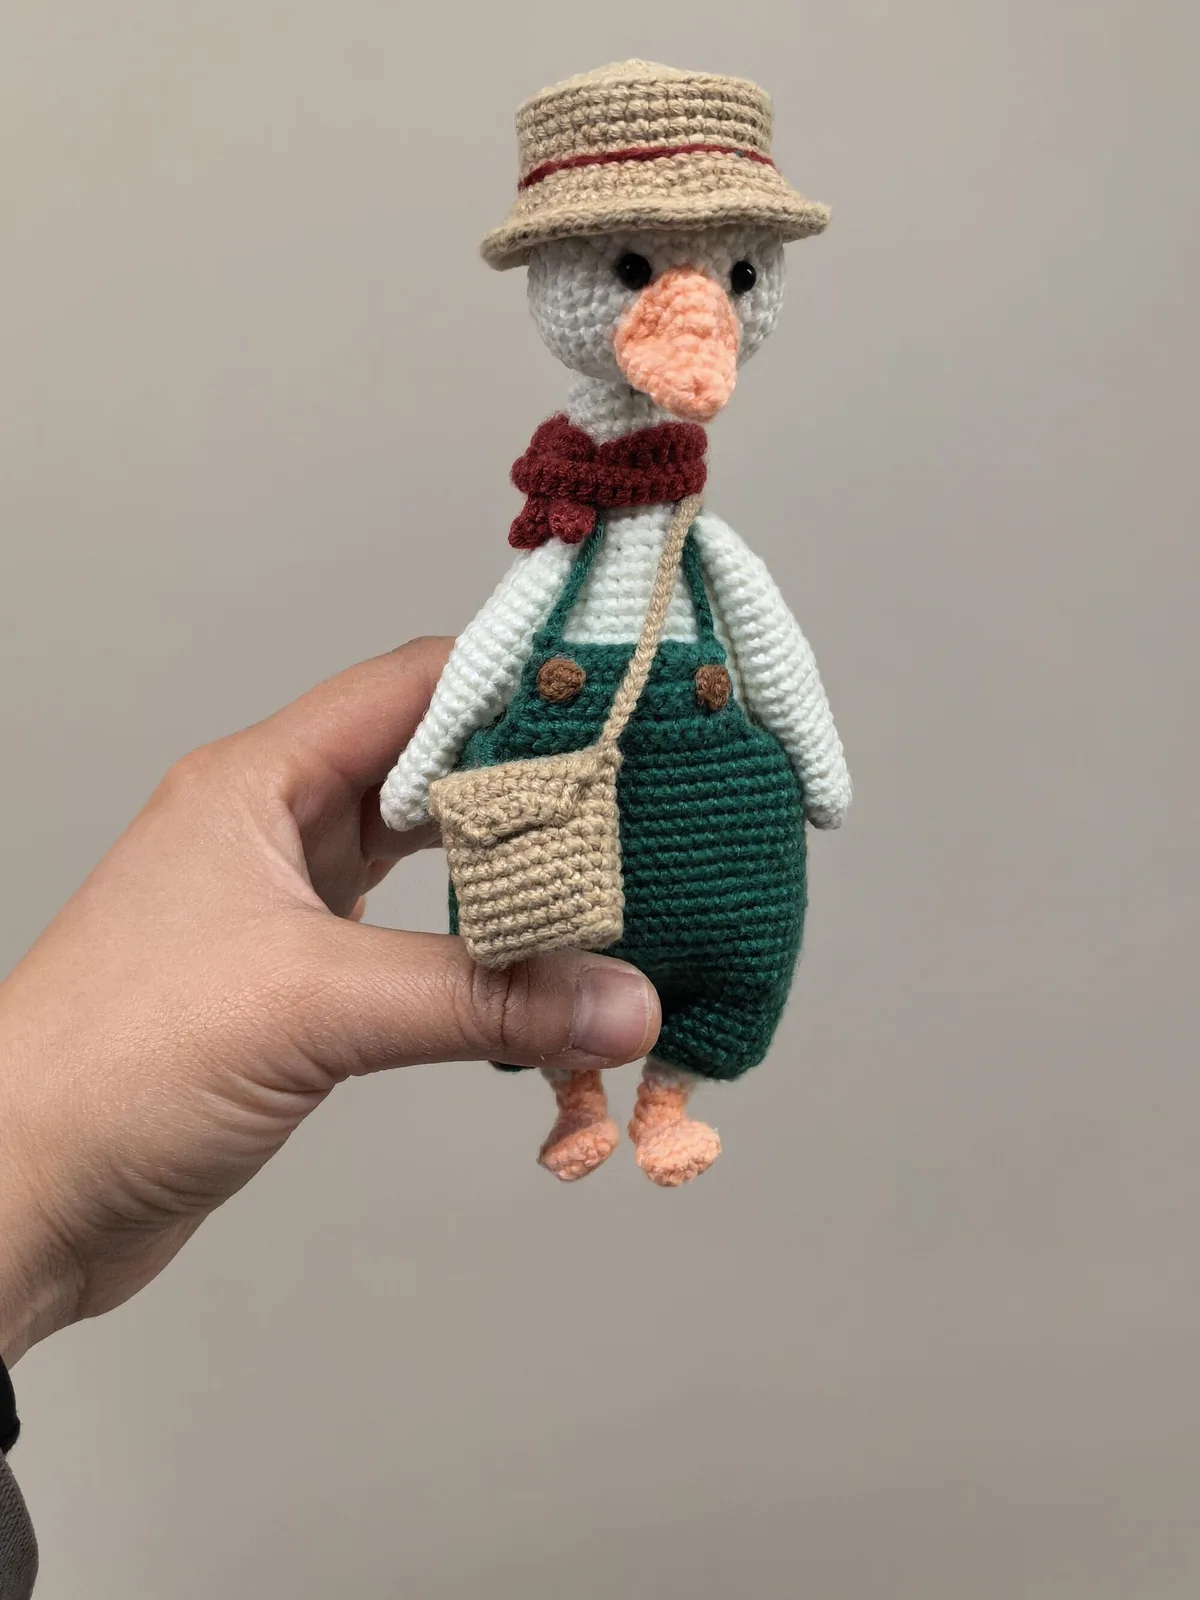
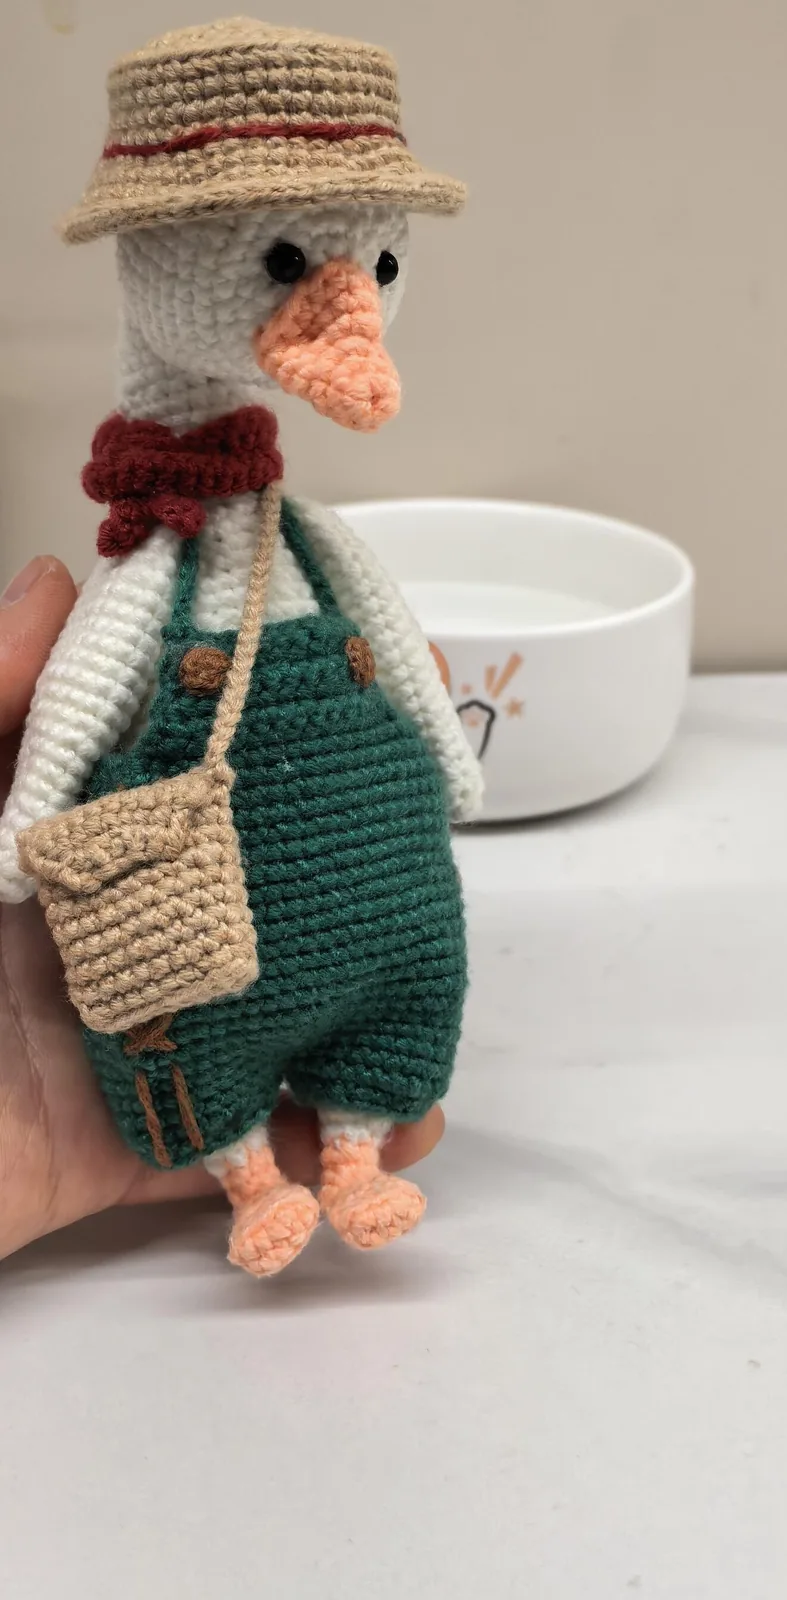
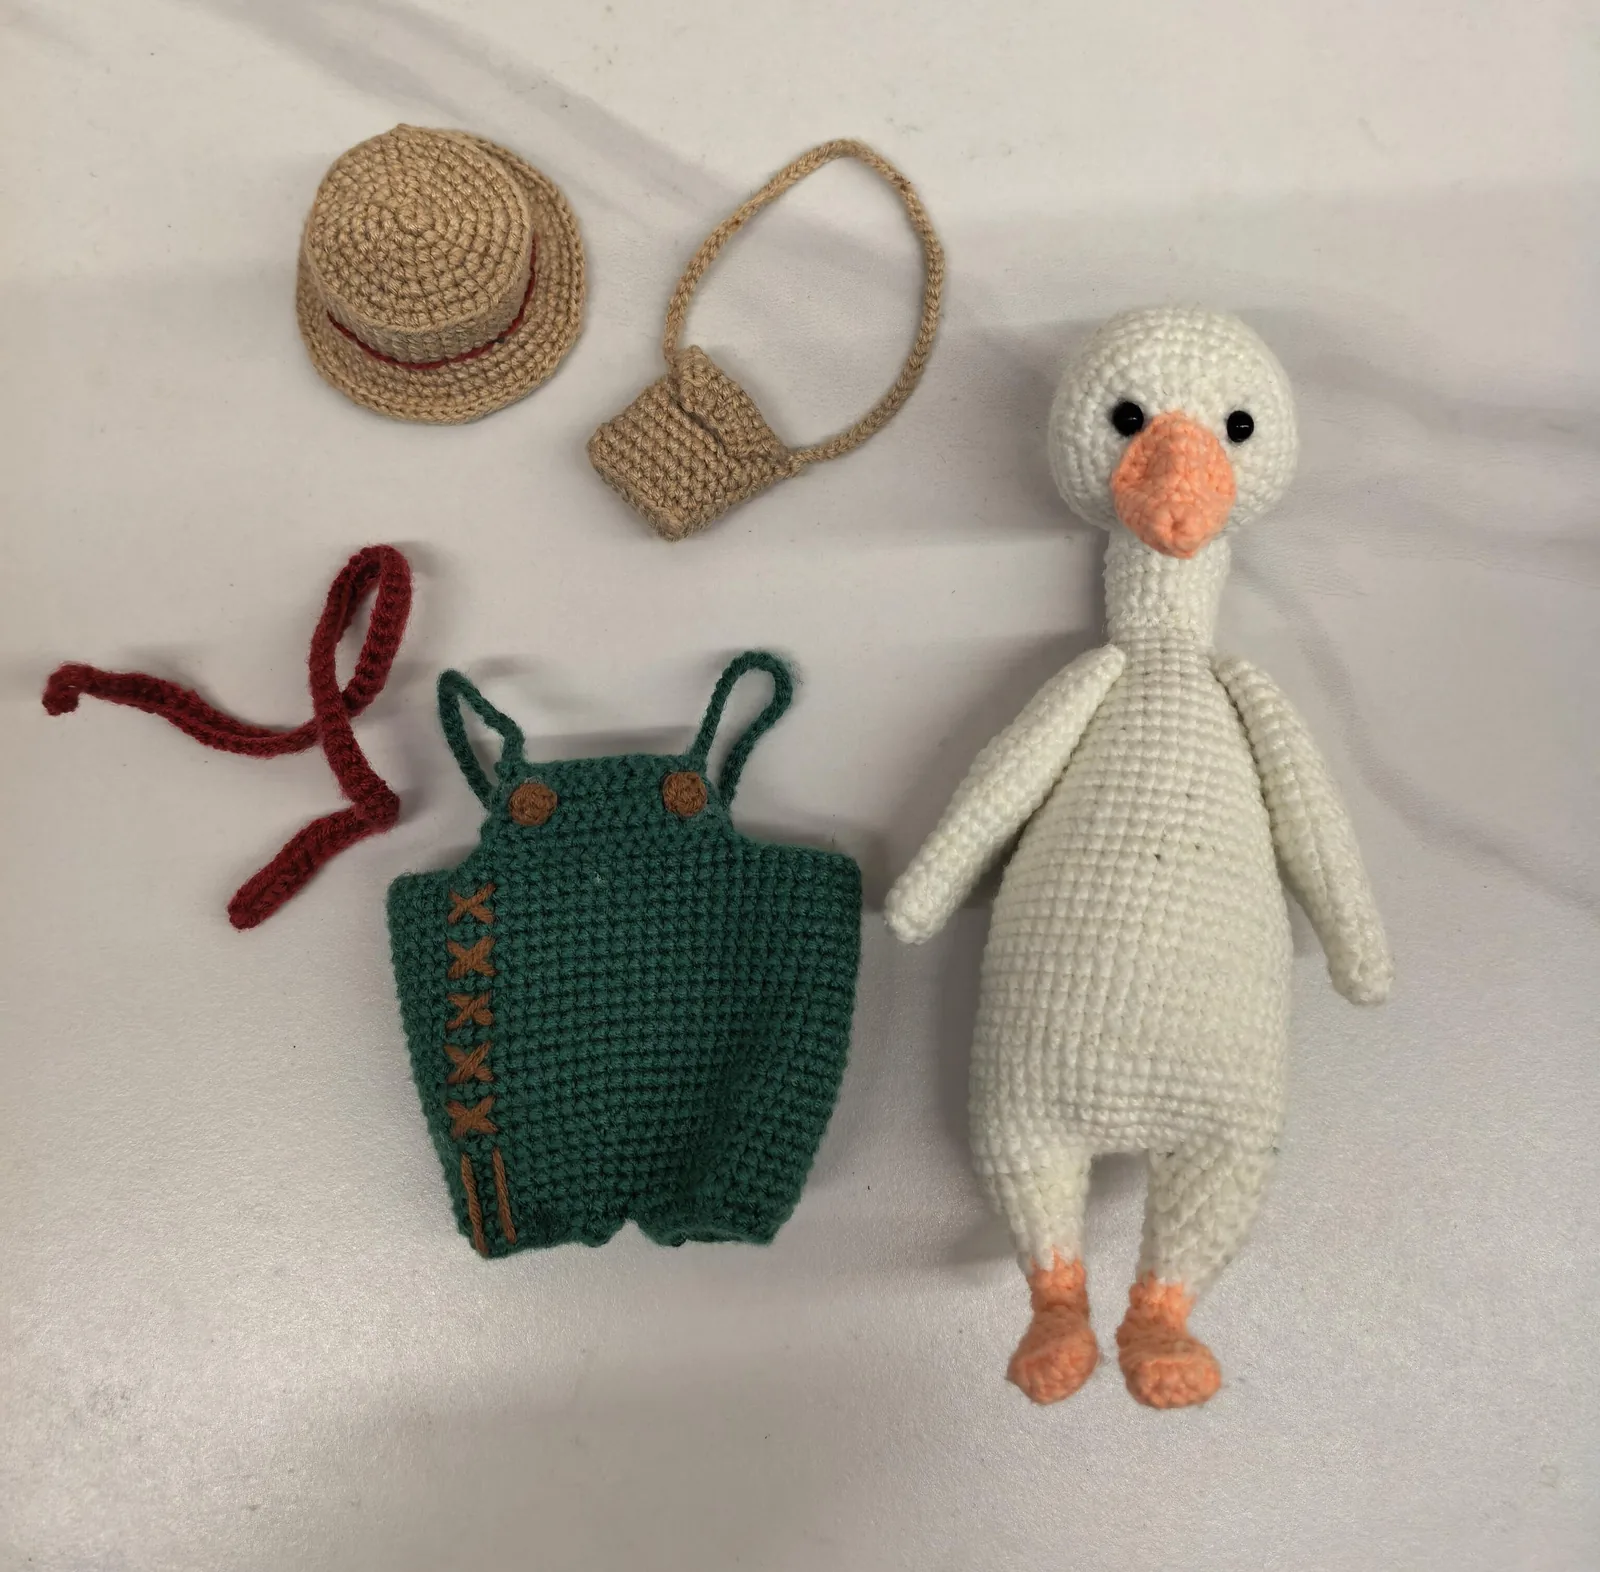
A white goose about 20 cm (8 in) tall with a long neck, peach-orange feet and beak, and a set of clothes that come off: green overalls with two straps, a straw-look brimmed hat with a red band, a red scarf and a small shoulder bag. The legs and body are one piece worked up from the feet, the head and neck are one piece, and everything is single crochet with a few half double and double crochets, in spiral rounds with a fine yarn and a 1.15 mm hook.
Shared on Loopy Panda with the designer's permission. Every round's stitch count is checked.
What you need
- A fine yarn (about 160 m per 50 g, a little finer than 4-ply milk cotton) in white (body, head, neck, wings), peach orange (feet, beak), green (overalls), tan (hat and bag; a jute or jute-look yarn makes the hat look like straw) and dark red (scarf, hat band), plus a little brown for the embroidered buttons. The designer didn't name the yarn; this is our reading of the photos and the hook size.
- Crochet hook: 1.15 mm. With 4-ply milk cotton and a 2.0 mm hook it works too and comes out about 24–25 cm tall.
- Two black 4–5 mm bead eyes and a little white thread for the eye detail; pink blush (optional)
- Two 5 mm buttons for the overalls (or embroider them) and one 6–7 mm button for the bag
- Fibre stuffing, stitch markers and a tapestry needle. The scarf in the photos is knitted (two needles); a crochet version is given too.
- Finished size: about 20 cm (8 in) tall without the hat, with a fine yarn and a 1.15 mm hook
Abbreviations (US terms)
Everything in the round is worked in continuous spiral rounds (no slip stitch, no turning chain between rounds): put a stitch marker in the first stitch of each round and move it up. The number in brackets is the stitch count at the end of the round or row.
| Abbreviation | Chinese pattern | Meaning |
|---|---|---|
| ch | CH | chain |
| sc | X | single crochet |
| hdc | T | half double crochet |
| dc | F | double crochet |
| inc | V | 2 sc in the same stitch |
| 3 sc in one st | W | 3 sc in the same stitch |
| dec | A | 2 sc together (invisible decrease) |
| sl st | SL / 引拔 | slip stitch |
| BLO / FLO | 后半针 / 前半针 | back loop only / front loop only |
Legs (peach orange, then white, make 2)
- Each leg starts as a small oval foot.
- Foundation: Ch 5
- Rnd 1: inc in 2nd ch from hook, sc in next 2 ch, 3 sc in last ch, working along the other side of the chain, sc in next 3 ch (10)
- Rnd 2: BLO sc in each st around (10)
- Rnd 3: (dec, sc 3) x2 (8)
- Rnd 4: (dec, sc 2) x2 (6)
- Rnd 5: dc 3, sl st 3 (6). The 3 dc make the heel: they should end up at the back of the leg, the slip stitches over the front of the foot.
- Rnds 6–7: sc in each st around (6)
- Change to white (see colour changes).
- Rnd 8: (sc 2, inc) x2 (8)
- Rnd 9: (sc 3, inc) x2 (10)
- Rnd 10: (sc 4, inc) x2 (12)
- Rnd 11: (sc 5, inc) x2 (14)
- First leg: work 8 more sc and stop there, so the yarn ends at the right side of the leg (work a stitch or two more or less if it doesn't). Fasten off.
- Second leg: work Rnds 1–11 the same, then Rnd 12: sc in each st around (14), and about 3 sc more so the yarn sits on the inner side of the leg. Don't fasten off: ch 4 and sl st into the inner side of the first leg.
Body (white, worked on from the second leg)
- Carry on from the second leg, round and round both legs and the 4 chains between them: first leg, one side of the chain, second leg, the other side of the chain.
- Rnd 13: sc 14 around the first leg, sc 4 along the chain, sc 14 around the second leg, sc 4 along the other side of the chain (36)
- Rnd 14: sc 14, inc, sc 2, inc, sc 14, inc, sc 2, inc (40)
- Rnd 15: sc 14, inc, sc 4, inc, sc 14, inc, sc 4, inc (44)
- Rnd 16: sc 7, inc, sc 20, inc, sc 15 (46)
- Start stuffing and keep stuffing as you go (see stuffing amigurumi).
- Rnds 17–28: sc in each st around (46)
- Work 9–10 sc more so the decreases that follow fall at the two sides of the body.
- Rnd 29: (dec, sc 21) x2 (44)
- Rnd 30: sc in each st around (44)
- Rnd 31: (dec, sc 20) x2 (42)
- Rnd 32: sc in each st around (42)
- Rnd 33: (dec, sc 19) x2 (40)
- Rnd 34: sc in each st around (40)
- Rnd 35: (dec, sc 18) x2 (38)
- Rnd 36: (dec, sc 17) x2 (36)
- Rnd 37: (dec, sc 16) x2 (34)
- Rnd 38: sc in each st around (34)
- Rnd 39: (dec, sc 15) x2 (32)
- Rnd 40: (dec, sc 14) x2 (30)
- Rnd 41: (dec, sc 13) x2 (28)
- Rnd 42: (dec, sc 12) x2 (26)
- Rnd 43: (dec, sc 11) x2 (24)
- Rnd 44: (dec, sc 10) x2 (22)
- Rnd 45: (dec, sc 9) x2 (20)
- Rnd 46: (dec, sc 8) x2 (18)
- Finish stuffing, fasten off and leave a long tail. The 18 stitches of the last round are sewn to the 18 stitches of the neck.
Head (white)
- Rnd 1: 6 sc in a magic ring (6)
- Rnd 2: inc in each st around (12)
- Rnd 3: (sc, inc) x6 (18)
- Rnd 4: (sc 2, inc) x6 (24)
- Rnd 5: (sc 3, inc) x6 (30)
- Rnd 6: (sc 4, inc) x6 (36)
- Rnd 7: (sc 5, inc) x6 (42)
- Rnd 8: (sc 6, inc) x6 (48)
- Rnd 9: (sc 7, inc) x6 (54)
- Rnd 10: (sc 8, inc) x6 (60)
- Split the 60 stitches into 18 and 42 and put a marker at both ends of the 18. The 18 are left for the neck.
- Rnd 11: sc 42, skip 18 sts (42). After the 42nd sc, go straight on into the first of the 42, leaving the 18 unworked, and carry on in a spiral.
- Rnds 12–16: sc in each st around (42)
- Rnd 17: (sc 5, dec) x6 (36)
- Rnd 18: (sc 4, dec) x6 (30)
- Rnd 19: (sc 3, dec) x6 (24)
- Stuff the head. If you use safety eyes instead of bead eyes, put them in now (see safety eyes).
- Rnd 20: (sc 2, dec) x6 (18)
- Rnd 21: (sc, dec) x6 (12)
- Rnd 22: dec x6 (6)
- Close the hole and weave in the end.
Neck (white, on the 18 stitches left on the head)
- The neck grows out of the 18 stitches left at Rnd 10 of the head: join the white yarn in the first of them.
- Rnd 1: sc 18 (18). A small gap can stay where the 18 meet the 42; close it with the yarn tail at the end.
- Rnds 2–3: hdc, sc 16, hdc (18)
- Rnd 4: hdc 2, sc 15, sl st in next st (18)
- Last part round: hdc 3, sc 6 and a sl st in the next stitch, and leave the last 8 stitches unworked. The yarn should now be at the back of the neck and the hdc at the front: the neck comes out taller in front, so the head leans forward like a goose's.
- Fasten off and leave a long tail for sewing the neck to the body.
Beak (peach orange)
- Rnd 1: 6 sc in a magic ring (6)
- Rnd 2: (sc, inc) x3 (9)
- Rnd 3: sc 3, inc 3, sc 3 (12)
- Rnd 4: sc 4, inc 4, sc 4 (16)
- Rnds 5–6: sc in each st around (16)
- Sl st, fasten off and leave a long tail. Don't stuff: flatten it and pinch it into a wide flat goose beak as in the photos.
Wings (white, make 2)
- Rnd 1: 6 sc in a magic ring (6)
- Rnd 2: (sc, inc) x3 (9)
- Rnd 3: sc in each st around (9)
- Rnd 4: (sc 2, inc) x3 (12)
- Rnd 5: sc in each st around (12)
- Rnd 6: (sc 3, inc) x3 (15)
- Rnd 7: sc in each st around (15)
- Rnd 8: (sc 4, inc) x3 (18)
- Rnd 9: sc in each st around (18)
- Rnd 10: (sc 5, inc) x3 (21)
- Rnds 11–18: sc in each st around (21)
- Rnd 19: (sc 5, dec) x3 (18)
- Rnds 20–21: sc in each st around (18)
- Put a little stuffing in the lower half only and flatten the open end. Fasten off and leave a long tail.
Overalls (green)
- Leave a long tail (about 40 cm) at the start: it makes the first strap later. The bib is worked flat; chain 1 and turn at the start of each row from Row 2 on (the turning chain isn't a stitch).
- Row 1: ch 13, sc in 2nd ch from hook and in each ch across (12)
- Rows 2–3: sc in each st across (12)
- Row 4: inc, sc 10, inc (14)
- Row 5: sc in each st across (14)
- Row 6: inc, sc 12, inc (16)
- Row 7: sc in each st across (16)
- Don't fasten off: ch 44 and join it to the first stitch of Row 7, making a ring. From here on the overalls are worked in the round.
- Rnd 8: sc 16, sc 44 along the chain (60)
- Rnds 9–22: sc in each st around (60)
- Rnd 23: (sc 8, dec) x6 (54)
- Rnd 24: (sc 7, dec) x6 (48)
- Rnds 25–27: sc in each st around (48)
- Work 10–12 sc more so the yarn sits in the middle between the legs (this isn't a round).
Overalls legs and straps (green, brown for the buttons)
- Split the 48 stitches into two halves of 24 and work one leg at a time on its 24 stitches.
- Rnds 28–29: sc 24 (24)
- Rnd 30: (sc 2, dec) x6 (18)
- Sl st, fasten off and leave a tail; sew up the small gap between the two legs.
- Straps: with the long tail left at the start, ch 34 and join it to the back of the overalls, at about Rnd 8. Join the yarn in the other top corner of the bib and make the second strap the same, joined at the matching place at the back. Weave in the ends.
- Embroider a round brown button where each strap meets the bib, or sew on the 5 mm buttons. The overalls in the photos also have a row of brown cross stitches and two lines down one side; they're optional.
Hat (tan)
- Rnd 1: 6 sc in a magic ring (6)
- Rnd 2: inc in each st around (12)
- Rnd 3: (sc, inc) x6 (18)
- Rnd 4: (sc 2, inc) x6 (24)
- Rnd 5: (sc 3, inc) x6 (30)
- Rnd 6: (sc 4, inc) x6 (36)
- Rnd 7: (sc 5, inc) x6 (42)
- Rnd 8: BLO sc in each st around (42). The flat top turns down here into the sides of the hat.
- Rnds 9–11: sc in each st around (42)
- Rnd 12: FLO (sc 6, inc) x6 (48). The brim turns out here.
- Rnd 13: (sc 7, inc) x6 (54)
- Rnd 14: (sc 8, inc) x6 (60)
- Rnd 15: (sc 9, inc) x6 (66)
- Rnd 16: sl st in each st around (66)
- Fasten off and weave in the end. Hat band: wrap the dark red yarn twice around the lowest round of the sides, just above the brim, and knot it inside the hat.
Shoulder bag (tan)
- Foundation: Ch 10
- Rnd 1: inc in 2nd ch from hook, sc in next 7 ch, 3 sc in last ch, working along the other side of the chain, sc in next 8 ch (20)
- Rnd 2: BLO sc in each st around (20). The flat base turns up here into the sides of the bag.
- Rnds 3–9: sc in each st around (20)
- Work 2–3 sc more so the yarn sits at one side of the bag. The flap is worked flat on the 10 stitches of the back side; chain 1 and turn at the start of each row.
- Rows 10–13: sc 10 (10)
- In the middle of the last row, ch 7 and join it back into the same stitch: this is the button loop.
- Ch 65 and join it to the other side of the bag for the shoulder strap. Sew the 6–7 mm button on the front of the bag, under the button loop.
Scarf (dark red)
- The scarf in the photos is knitted: cast on 70 stitches, knit 1 row, purl 1 row, knit 1 row and cast off. Stocking stitch this narrow rolls up by itself, as in the photos.
- Crochet version (our addition, for anyone who doesn't knit): turn at the end of each row with ch 1 (it isn't a stitch).
- Row 1: ch 71, sc in 2nd ch from hook and in each ch across (70)
- Row 2: sc in each st across (70)
- Fasten off, weave in the ends, wrap it round the neck and tie it at one side.
Assembly
- Neck to bodySew the 18 stitches at the end of the neck to the last 18 stitches of the body (see sewing amigurumi parts), with the taller hdc side of the neck at the front.
- WingsSew the flattened open end of each wing to the side of the body between Rnds 43 and 44, one on each side, so they hang straight down.
- BeakSew the open end of the beak to the middle of the front of the head. The designer's sheet doesn't give the round; in the photos it sits a little below the middle of the head.
- EyesSew the bead eyes just above the beak, one on each side, about 2–3 stitches from it (our reading of the photos). With white thread, make a small stitch under each eye for a little white highlight.
- FinishingBrush a little blush on the cheeks if you like. To shape the head, take the yarn through the head from one side to the other and pull it a little tight.
Chart symbols on this page
Frequently asked questions
Who designed the retro goose?
A crocheter friend of our maker, who let us share the pattern on Loopy Panda and translate it. We checked every round's stitch count and fixed the slips in the original sheet (Rnd 20 of the head makes 18 stitches, the overalls rounds 25–27, the overalls legs as Rnds 28–29). The yarn, the colours of the hat and bag, how the second strap starts, the hat band, the eyes, how much to stuff the wings and where the beak and eyes go are our reading of the photos.
Why a 1.15 mm hook?
That is the hook the designer uses, with a fine yarn, so the stitches are tiny and tight and the goose is 20 cm tall. Any hook that gives a firm fabric with your yarn works: with 4-ply milk cotton and a 2.0 mm hook the goose comes out about 24–25 cm tall and the clothes still fit, because they are made with the same yarn and hook.
Is it good for a beginner?
It's mostly single crochet, increases and decreases, but there are many parts and a few new things: starting on a chain, joining two legs, a neck worked off the side of the head, and flat rows for the bib and the bag flap. It makes a good third or fourth doll; if you are new, start with the beginner's amigurumi guide.
Tell me when new free patterns are out
We'll send you a short email when a new free pattern or tutorial goes up. No spam.
Thank you! You're on the list. We'll email you when a new free pattern is out.
Please enter a valid email address.
Please tick the box to agree to receive our emails.
Too many tries. Please wait a few minutes and try again.
Something went wrong. Please try again later.
New short videos every week, too, on YouTube