 Loopy Panda
Little Sheep in Overalls: Sheep Amigurumi Pattern
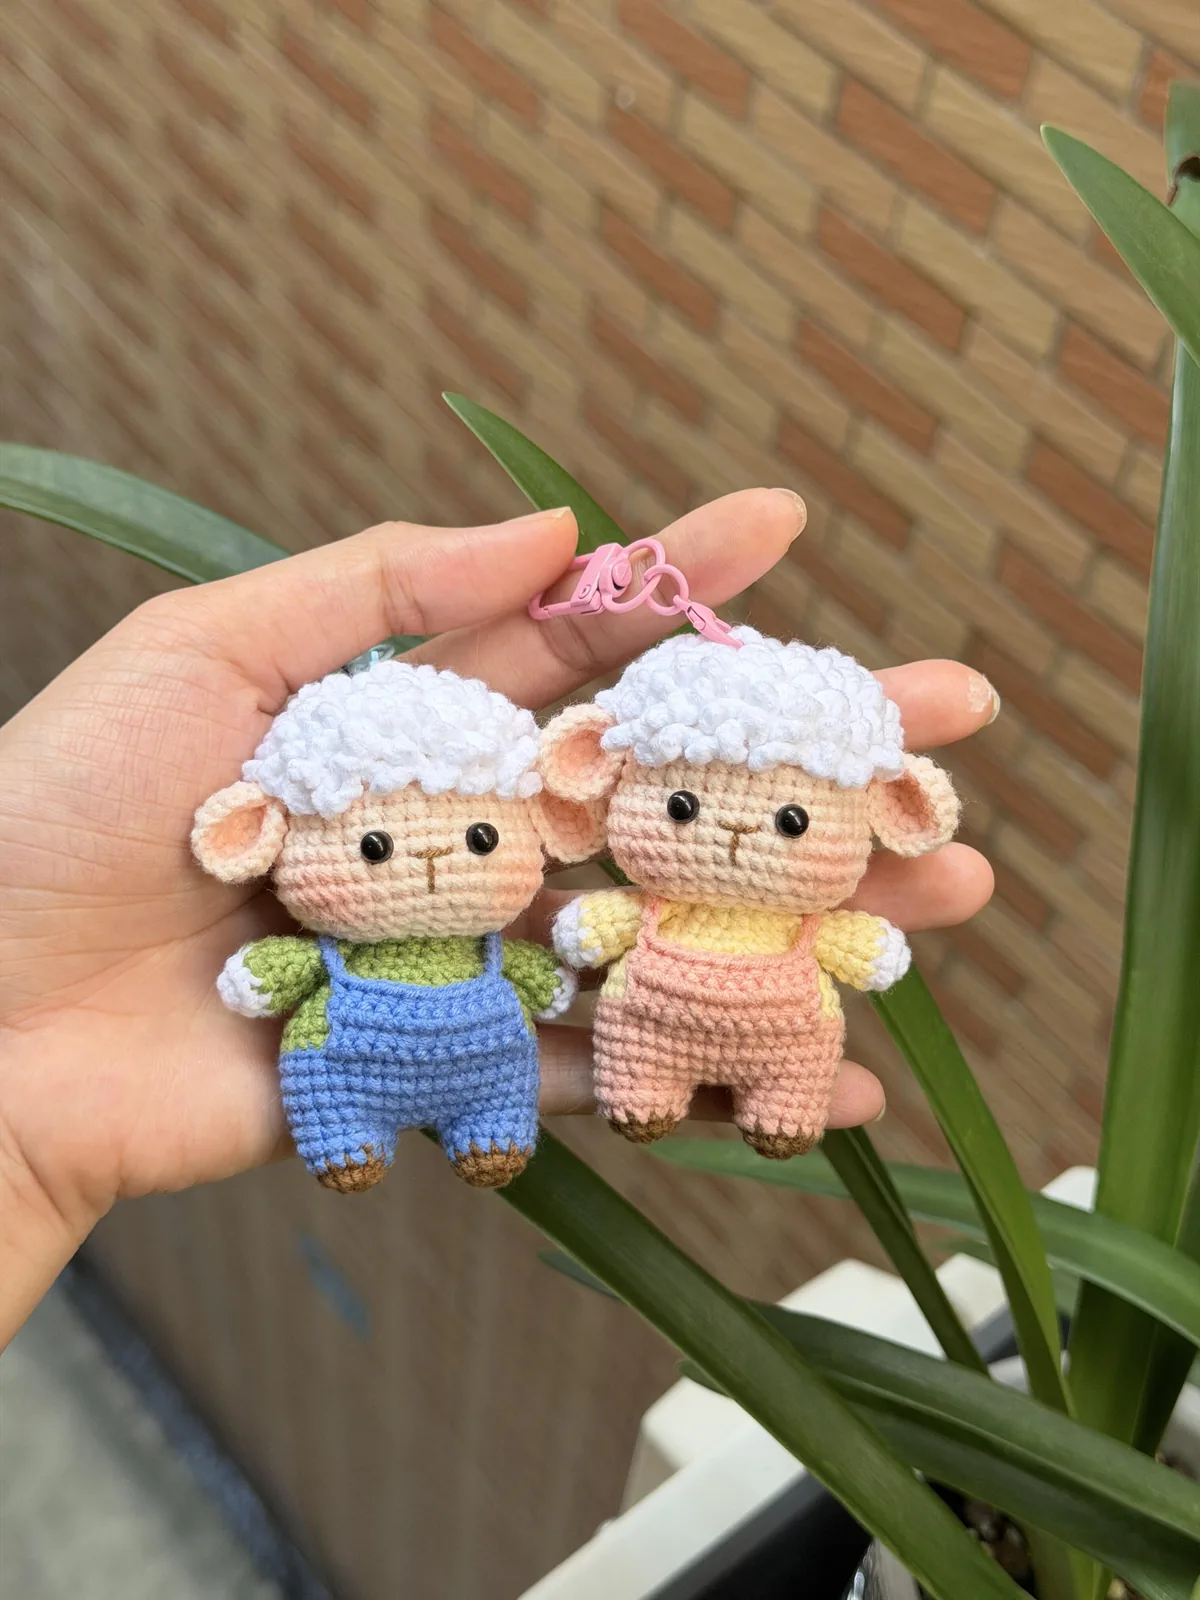
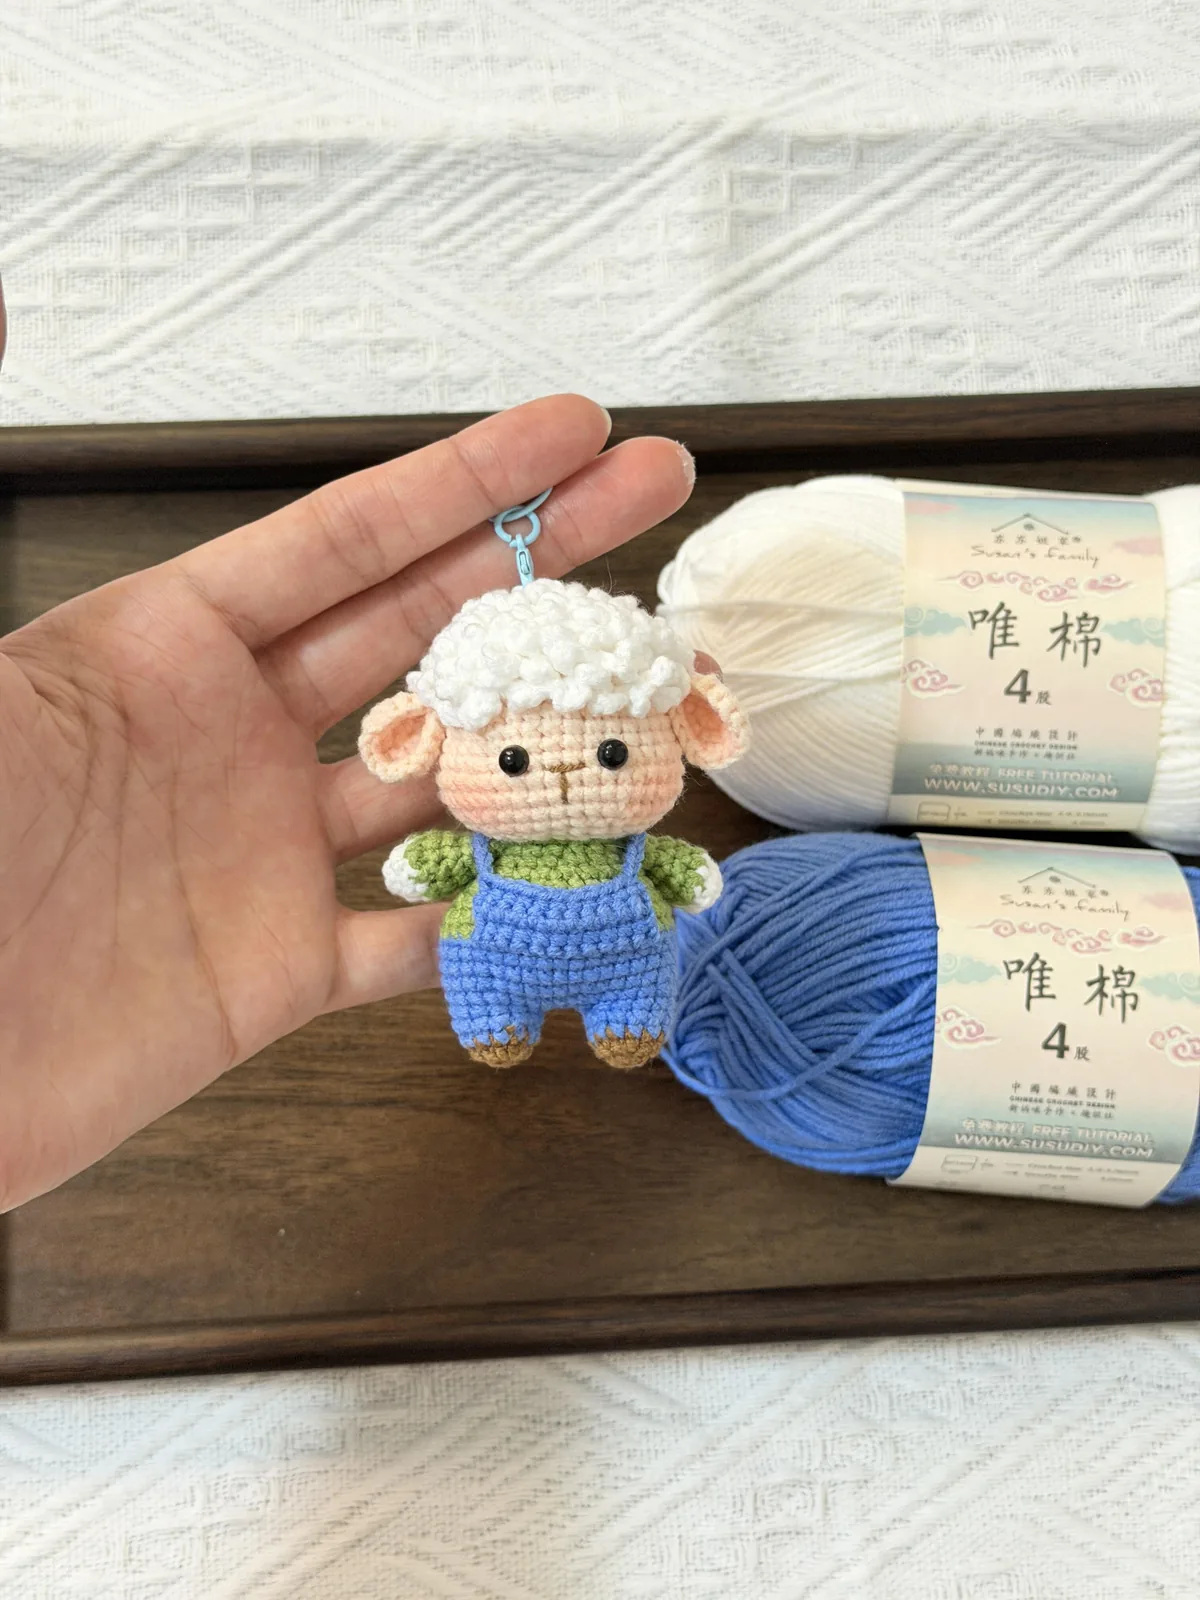
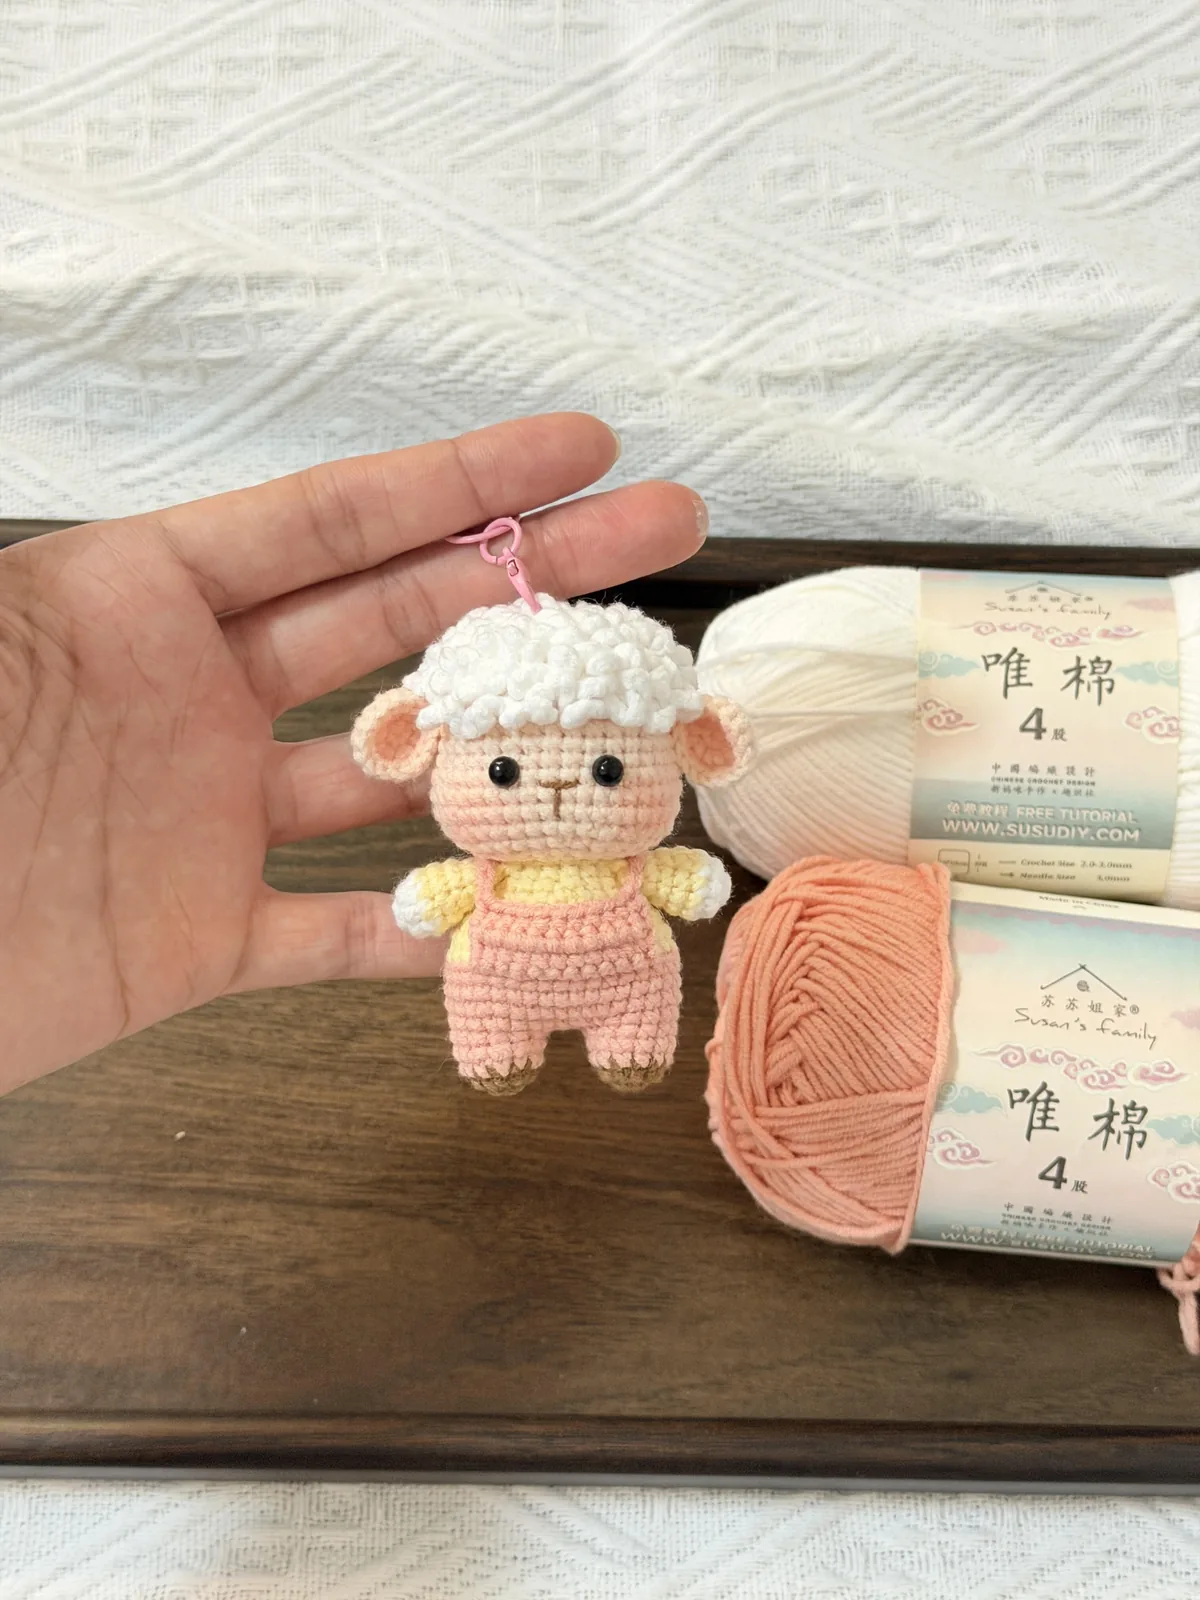
A small sheep keychain, about 7–8 cm tall, with a curly white fleece made of chain loops, round ears, and overalls with a bib and two straps, in blue over a green top or pink over a yellow top. The legs and body are one piece worked up from the feet, the head is made separately from the crown down and sewn on; all single crochet in joined rounds, with a 4-ply cotton.
Shared on Loopy Panda with the designer's permission. Every round's stitch count is checked.
What you need
- 4-ply cotton yarn (the yarn in the photos is Susan's Family 唯棉 4-ply milk cotton) in skin colour (head, ears), cream white (fleece, hand tips), dark brown (feet), the overalls colour (blue or pink: legs, lower body, bib) and the top colour (green or yellow: upper body, arms)
- Crochet hook: 2.0–2.5 mm (the designer didn't give a size; the yarn label suggests 2.0–3.0 mm, and the smaller end gives the firm fabric a keychain needs)
- Two small black safety eyes (about 5 mm), brown yarn for the nose and mouth, pink blush for the cheeks and ears
- A keychain clasp with a short chain
- Fibre stuffing, stitch markers and a tapestry needle
- Finished size: about 7–8 cm (3 in) tall without the clasp, judged from the photos; 4-ply cotton
Abbreviations (US terms)
All parts in the round are worked in joined rounds: at the end of every round, sl st into the first stitch, ch 1 (it isn't a stitch) and work the first stitch of the next round into the same stitch as the sl st. The number in brackets is the stitch count at the end of the round or row.
BLO = work into the back loop only (the inner half loop). A round worked in BLO leaves the front loops of the round below free; the fleece and the overalls bib are worked into those free loops later.
| Abbreviation | Chinese pattern | Meaning |
|---|---|---|
| ch | CH | chain |
| sc | X | single crochet |
| inc | V | 2 sc in the same stitch |
| dec | A | 2 sc together (invisible decrease) |
| BLO | 钩内半针 | back loop only |
| sl st | 引拔 | slip stitch |
Head (skin colour)
- Worked from the crown down. Rnds 2–7 are worked in BLO so the fleece can go into the free front loops.
- Rnd 1: 6 sc in a magic ring (6)
- Rnd 2: BLO inc in each st around (12)
- Rnd 3: BLO (sc, inc) x6 (18)
- Rnd 4: BLO (sc, inc, sc) x6 (24)
- Rnd 5: BLO (sc 3, inc) x6 (30)
- Rnd 6: BLO sc in each st around (30)
- Rnd 7: BLO (sc 2, inc, sc 2) x6 (36)
- Rnds 8–10: sc in each st around (36)
- The two groups of increases in Rnd 11 (and the decreases in Rnd 14) puff out the cheeks; the 6 stitches between them are the middle of the face. Because the rounds are joined, the groups stay in line.
- Rnd 11: sc 9, (sc, inc) x3, sc 6, (sc, inc) x3, sc 9 (42)
- Rnds 12–13: sc in each st around (42)
- Rnd 14: sc 9, (sc, dec) x3, sc 6, (sc, dec) x3, sc 9 (36)
- Rnd 15: (sc 2, dec, sc 2) x6 (30)
- Fit the safety eyes now (see the assembly).
- Rnd 16: (sc 3, dec) x6 (24). Stuff the head firmly.
- Rnd 17: (sc, dec, sc) x6 (18). Add a little more stuffing, fasten off and weave in the end; the head is sewn on with the body's tail.
Legs and body (dark brown, overalls colour, top colour)
- Make 2 legs (Rnd 1–4). Fasten off the first leg; keep the second one on the hook.
- Start with dark brown (the shoes).
- Rnd 1: 6 sc in a magic ring (6)
- Rnd 2: inc in each st around (12); change to the overalls colour (blue or pink) in the last stitch (see colour changes).
- Rnds 3–4: sc in each st around (12)
- Join the legs: ch 3 from the second leg and sl st into a stitch of the first leg.
- Rnd 5: sc 12 around the first leg, sc 3 along the chain, sc 12 around the second leg, sc 3 along the other side of the chain (30)
- Rnd 6: (sc 2, inc, sc 2) x6 (36)
- Rnds 7–9: sc in each st around (36); change to the top colour (green or yellow) in the last stitch of Rnd 9.
- Rnd 10: BLO sc in each st around (36) (the free front loops are for the overalls bib)
- Rnd 11: sc 6, dec, sc 16, dec, sc 10 (34)
- Rnd 12: sc 4, dec 2, sc 14, dec 2, sc 8 (30)
- Rnd 13: (sc 2, dec, sc 2) x5 (25)
- Rnd 14: sc 10, dec, sc 13 (24)
- Rnd 15: (sc, dec, sc) x6 (18). Stuff the legs and body firmly.
- Rnd 16: sc in each st around (18). Leave a long tail for sewing the head on.
Arms (cream white and top colour, make 2)
- Start with cream white (the hand).
- Rnd 1: 6 sc in a magic ring (6)
- Rnd 2: (sc, inc) x3 (9); change to the top colour in the last stitch.
- Rnds 3–6: sc in each st around (9)
- To close: flatten the opening and work 4 sc through both layers. Nine stitches don't pair up: the odd one is left at the end of the edge, so work the last sc through it and the last pair together. Leave a long tail for sewing.
Ears (skin colour, make 2)
- Rnd 1: 6 sc in a magic ring (6)
- Rnd 2: inc in each st around (12)
- Rnd 3: (sc, inc) x6 (18). Don't stuff; leave a long tail for sewing.
Fleece (cream white)
- Hold the head crown up. Join the cream yarn in a free front loop left by Rnd 2 (around the magic ring) and work (sc, ch 5) in every free front loop, round after round, down to the free loops left by Rnd 7. Each ch 5 makes one curl. Fasten off and weave in the end.
Overalls bib and straps (overalls colour)
- The bib is worked flat into the free front loops left by Rnd 10 of the body. Chain 1 and turn at the end of each row (the turning chain isn't a stitch).
- Find the middle of the front (between the legs) and count 5 stitches to the right. Join the overalls colour there and work Row 1 into the free front loops.
- Row 1: sc 11 (11)
- Rows 2–4: sc in each st across (11)
- Strap: at the end of Row 4, ch 15–18 (enough to go over the shoulder to the back) and sl st into a free front loop of Rnd 10 at the back, about 3 stitches from the middle of the back. Fasten off.
- Second strap: join the yarn at the other top corner of the bib and make the second strap the same way, so the straps reach the back about 6 stitches apart. Weave in the ends.
Assembly
- FaceThe safety eyes go in before Rnd 16 of the head, between Rnds 10 and 11, about 6 stitches apart over the middle of the face (the 6 stitches between the cheek increases), as in the photos (see safety eyes). Embroider a small brown nose and mouth just under and between the eyes, and brush pink blush on the cheeks.
- Head to bodySew the head onto the body with the body's long tail, the last 18 stitches of the head to the last 18 stitches of the body (see sewing amigurumi parts). Turn the head so the face is above the bib.
- EarsFold each ear in half at the base and sew it on at the side of the head, just under the edge of the fleece, so it points out and a little down as in the photos. Brush the inside with pink blush.
- ArmsSew the flat top of each arm to the side of the body just under the head, with the cream tip pointing out.
- KeychainSew or tie the keychain clasp's chain firmly through the top of the head under the fleece, so the sheep hangs straight.
Chart symbols on this page
Frequently asked questions
Who designed the little sheep in overalls?
A crocheter friend of our maker, who let us share the pattern on Loopy Panda and translate it. We checked every round's stitch count and filled in what the original sheet left open (the count of Rnd 14 of the head, Rnd 7 of the head in BLO so it matches where the fleece goes, closing the 9-stitch arms, the bib rows and where the straps go) from its stitch counts and photos. The finished size, the hook size and where the eyes and ears go are our reading of the photos.
Why are the rounds joined instead of worked in a spiral?
The designer joins every round with a slip stitch. It keeps the colour changes (shoes, overalls, top) straight all the way round and keeps the cheek increases and decreases in line under each other. The stitch counts are the same either way; if you work in a spiral, the colour lines get a small step.
Is it good for a beginner?
Everything is single crochet, increases and decreases, so it is a good second or third doll. The fiddly parts are back loop only rounds, joining the legs and the loop fleece; if they are new to you, start with the beginner's amigurumi guide and back loop only.
Tell me when new free patterns are out
We'll send you a short email when a new free pattern or tutorial goes up. No spam.
Thank you! You're on the list. We'll email you when a new free pattern is out.
Please enter a valid email address.
Please tick the box to agree to receive our emails.
Too many tries. Please wait a few minutes and try again.
Something went wrong. Please try again later.
New short videos every week, too, on YouTube