 Loopy Panda
Strawberry Bear Amigurumi Pattern (Lotso-Inspired)
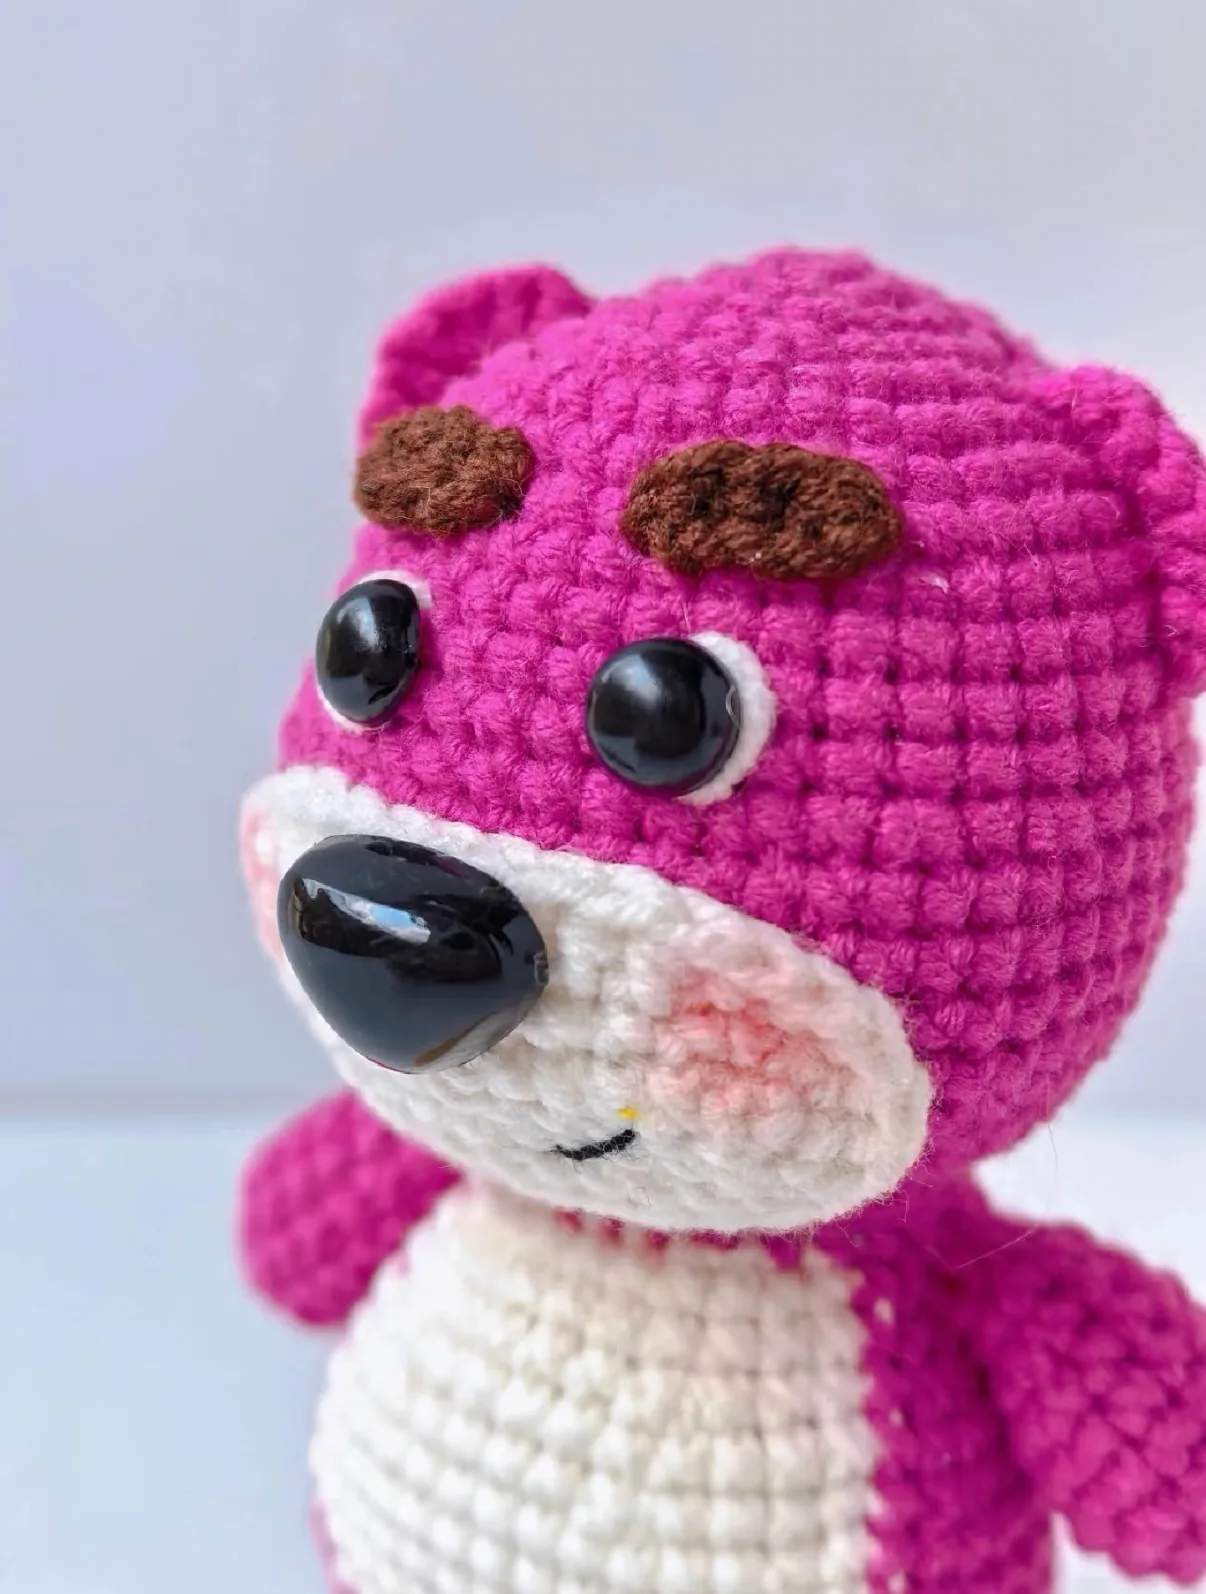
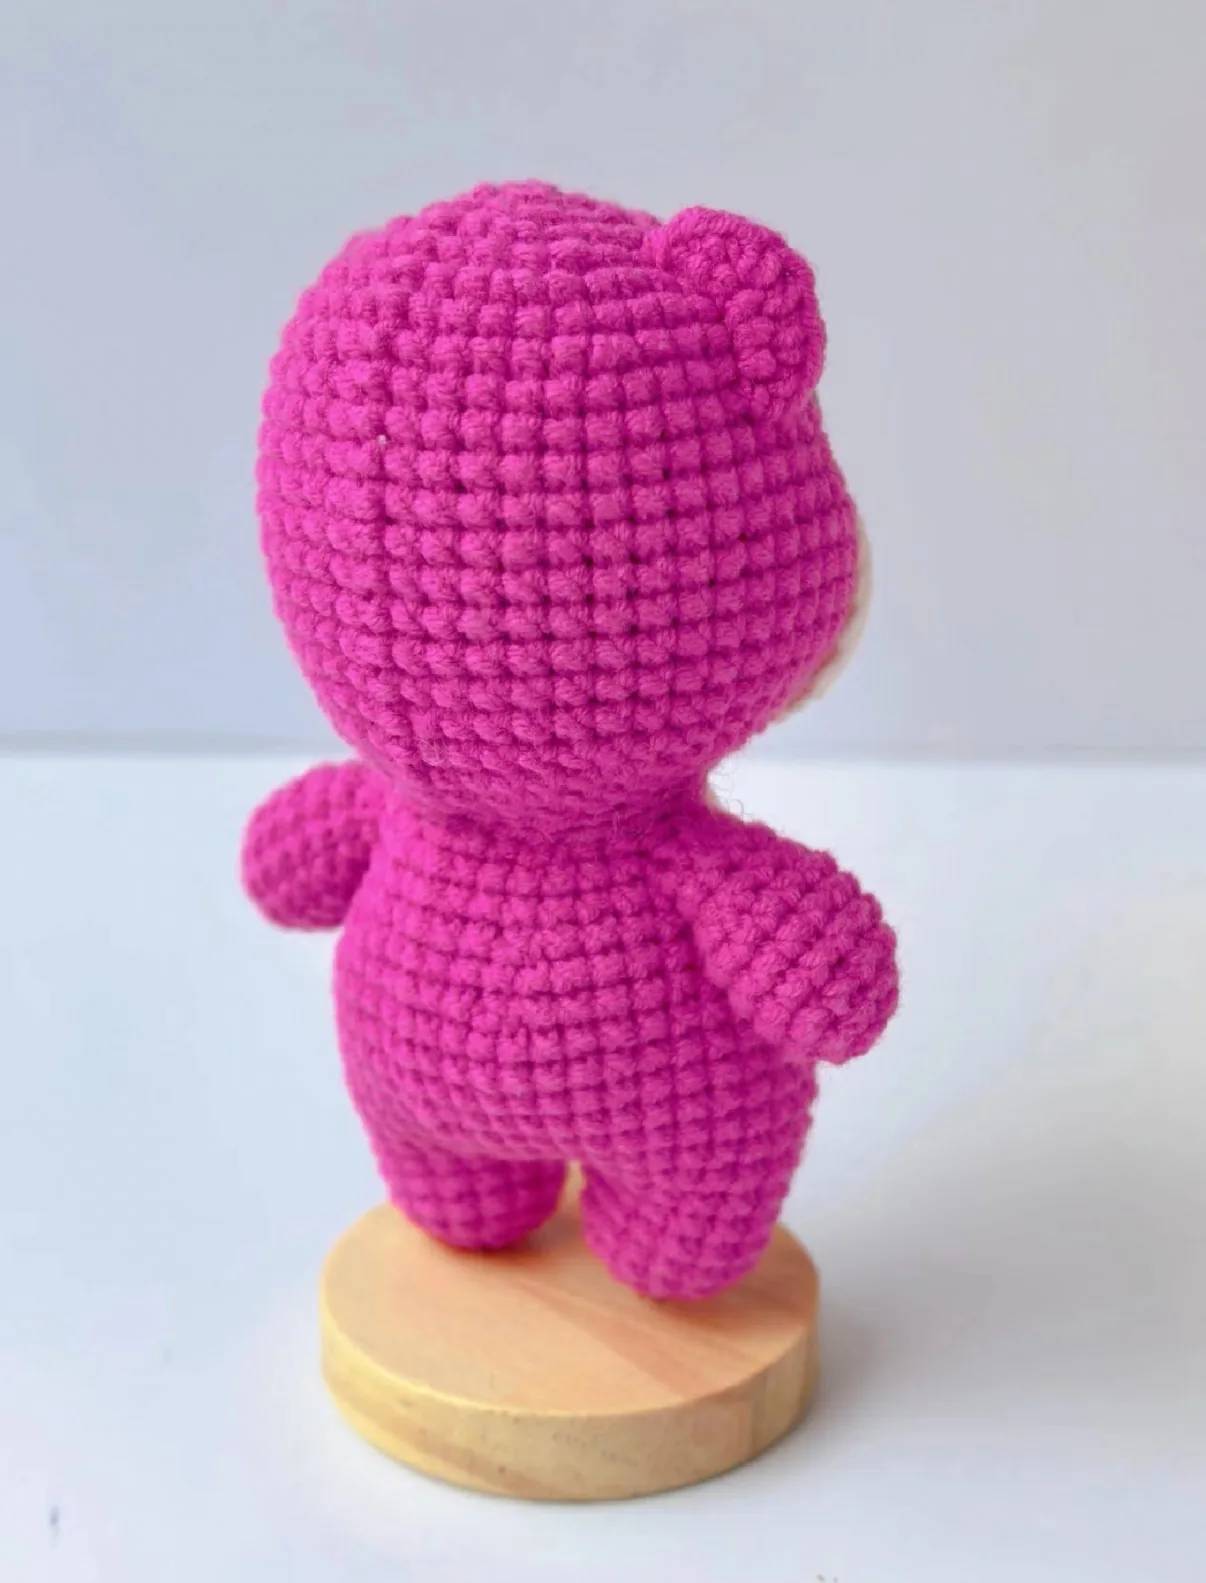
A small standing bear in rose pink with a white muzzle, white belly, brown eyebrows and safety eyes, worked in single crochet in the round. The legs are made first and joined into the body; the belly is colour-changed into the body rounds. The head, arms, ears, eyebrows, muzzle and tail are made separately and sewn or glued on.
Designed, crocheted and photographed by our maker. Every round's stitch count is checked. This is a free, fan-made pattern inspired by Lotso from Disney/Pixar's Toy Story 3. It is not official and not affiliated with or endorsed by the rights holder; if they ask us to, we will take it down.
What you need
- Yarn: 4-ply cotton (the maker's: Chinese 4-strand cotton yarn) in rose pink (bear), white (muzzle, belly, inner ears) and brown (eyebrows); a little black yarn for the mouth
- Crochet hook: 2.5 mm (the maker's size). With a thicker yarn use a bigger hook; the bear gets bigger and the stitch counts stay the same
- A pair of black safety eyes, a black safety nose and a little white felt for the eye whites
- Fibre stuffing, a stitch marker, a tapestry needle (and craft glue if you prefer gluing small parts)
Abbreviations (US terms)
The pattern is worked in a continuous spiral: don't join the rounds, and move a stitch marker up to the first stitch of every round. The number in brackets is the stitch count at the end of the round.
| Abbreviation | Chinese pattern | Meaning |
|---|---|---|
| ch | ch | chain |
| sc | X | single crochet |
| hdc | T | half double crochet |
| inc | V | increase: 2 sc in the same stitch |
| dec | A | decrease: 2 sc together (the invisible decrease looks best) |
| 3 sc in one st | W | 3 single crochet in the same stitch |
| MR | 环起 | magic ring |
Head (rose pink)
- Rnd 1: 6 sc in a magic ring (6)
- Rnd 2: inc in each st around (12)
- Rnd 3: (sc, inc) x6 (18)
- Rnd 4: (sc, inc, sc) x6 (24)
- Rnd 5: (sc 3, inc) x6 (30)
- Rnd 6: (sc 2, inc, sc 2) x6 (36)
- Rnd 7: sc in each st around (36)
- Rnd 8: (sc 5, inc) x6 (42)
- Rnd 9–12: sc in each st around (42)
- Rnd 13: sc 12, (sc, inc) x3, sc 6, (inc, sc) x3, sc 12 (48)
- Rnd 14–17: sc in each st around (48)
- Rnd 18: sc 12, (sc, dec) x3, sc 6, (dec, sc) x3, sc 12 (42)
- Rnd 19: sc in each st around (42)
- Rnd 20: (sc 5, dec) x6 (36)
- Rnd 21: (sc 2, dec, sc 2) x6 (30)
- Rnd 22: (sc 3, dec) x6 (24). Fasten off, leaving a long tail for sewing.
Rounds 13 and 18 put the extra stitches at the sides of the head, so it is wider than it is deep, like a bear's head. Put the safety eyes in before you stuff (see Eyes below).
Arms (rose pink, make 2)
- Rnd 1: 6 sc in a magic ring (6)
- Rnd 2: (sc, inc) x3 (9)
- Rnd 3: (sc, inc, sc) x3 (12)
- Rnd 4–6: sc in each st around (12)
- Rnd 7: (sc, dec, sc) x3 (9)
- Rnd 8: sc in each st around (9). Fasten off, leaving a long tail for sewing.
If you don't want to sew the arms, flatten the opening and crochet it into the body on round 17: work 4 sc through both the arm and the body stitches, one arm on each side, level with each other.
Legs and body (rose pink and white)
Make two legs (rounds 1–4). Round 5 goes around both legs and both sides of the 2-chain bridge between them, so the body starts with 34 stitches. From round 8 the white belly is worked into the front: the stitches in [square brackets] are in white, the rest in pink. Carry the colour you are not using inside the body, or cut it and join it again (see colour changes in amigurumi).
- Rnd 1: 6 sc in a magic ring (6)
- Rnd 2: inc in each st around (12)
- Rnd 3: (sc 3, inc) x3 (15)
- Rnd 4: sc in each st around (15) Fasten off the first leg. Don't fasten off the second one: chain 2 and join it to the first leg.
- Rnd 5: sc 15 around the first leg, sc 2 along the chain, sc 15 around the second leg, sc 2 along the other side of the chain (34)
- Rnd 6: sc 15, inc 2, sc 17 (36)
- Rnd 7: (sc 5, inc) x6 (42)
- Rnd 8: sc 15, [sc 10], sc 17 (42)
- Rnd 9: sc 14, [sc 12], sc 16 (42)
- Rnd 10–13: sc 13, [sc 14], sc 15 (42)
- Rnd 14: sc 3, dec, sc 5, dec, sc, [sc 4, dec, sc 5, dec, sc], sc 4, dec, sc 5, dec, sc 2 (36)
- Rnd 15: sc 11, [sc 12], sc 13 (36)
- Rnd 16: sc 2, dec, sc 4, dec, sc, [sc 3, dec, sc 4, dec, sc], sc 3, dec, sc 4, dec, sc 2 (30)
- Rnd 17: sc 9, [sc 10], sc 11 (30)
- Rnd 18: sc, dec, sc 3, dec, sc, [sc 2, dec, sc 3, dec, sc], sc 2, dec, sc 3, dec, sc 2 (24). Stuff the legs and body firmly.
The body ends with 24 stitches, the same as the head, so the two can be sewn together stitch for stitch.
Ears (make 2)
- Inner ear (white): 6 sc in a magic ring, don't join with a slip stitch. Fasten off.
- Outer ear (rose pink), Row 1: 6 sc in a magic ring, don't join; ch 1 and turn.
- Row 2: (sc, inc) x3 (9). Fasten off, leaving a long tail for sewing.
Glue the white inner ear onto the pink outer ear. Sew the ears on just below round 4 of the head.
Eyebrows (brown, make 2)
- Ch 4; starting in the 2nd chain from the hook, sc 3. Fasten off.
White muzzle
- Foundation: Ch 12
- Rnd 1: sc in 2nd ch from hook, sc in next 9 ch, 3 sc in last ch, working along the other side of the chain, sc in next 9 ch, inc in last ch (24)
- Rnd 2: inc, sc 9, inc 3, sc 9, inc 2 (30)
- Rnd 3: sc 2, hdc 9, sc 6, hdc 9, sc 4 (30). Fasten off, leaving a long tail.
The half double crochets in round 3 make the long sides of the oval slightly taller, which gives the muzzle its rounded cheeks. Sew or glue it on below round 12 of the head.
Eyes
Put the safety eyes between rounds 11 and 12 of the head, 2 stitches apart. For the eye whites, push each eye through a small piece of white felt and trim the felt in a thin ring around the eye before you fix the washer (see how to put in safety eyes).
Tail (rose pink)
- Rnd 1: 6 sc in a magic ring (6)
- Rnd 2: (sc, inc) x3 (9)
- Rnd 3: sc in each st around (9). Fasten off and sew or glue it on the bottom.
Assembly
- Head to bodyStuff the head and sew it onto the body, 24 stitches to 24 stitches (see sewing amigurumi parts).
- ArmsSew the arms on the sides of the body, level with each other, unless you crocheted them in on round 17.
- EarsSew the ears on just below round 4 of the head.
- FaceSew or glue the white muzzle below round 12 of the head. In the photos the black safety nose sits at the top of the muzzle, the mouth is embroidered below it in black, and the brown eyebrows are sewn on above the eyes.
- TailSew or glue the tail onto the bottom at the back.
Chart symbols on this page
Frequently asked questions
Is this an official Lotso pattern?
No. It is a free, fan-made pattern by our maker, inspired by the character. It is not affiliated with or endorsed by Disney or Pixar.
How do I make the white belly?
It is worked into the body from round 8 to round 18: the stitches in square brackets are white. Change colour on the last pull-through of the stitch before, and carry the unused yarn inside the body.
Why does the head have extra increases on round 13?
The 6 extra stitches go at the sides of the head (3 each side), and round 18 takes them away again. That makes the head wider than it is deep.
Can I crochet the arms into the body instead of sewing them?
Yes. Flatten the top of each arm and work 4 sc through the arm and the body together on round 17, one arm on each side.
How do I make the eye whites?
Push each safety eye through white felt, cut the felt in a thin ring around the eye, and then fix the eye in the head between rounds 11 and 12.
What yarn and hook did the maker use?
4-ply cotton yarn with a 2.5 mm hook. A thicker yarn and a bigger hook work too: the bear comes out bigger and the stitch counts stay the same.
Tell me when new free patterns are out
We'll send you a short email when a new free pattern or tutorial goes up. No spam.
Thank you! You're on the list. We'll email you when a new free pattern is out.
Please enter a valid email address.
Please tick the box to agree to receive our emails.
Too many tries. Please wait a few minutes and try again.
Something went wrong. Please try again later.
New short videos every week, too, on YouTube