 Loopy Panda
Mr. Fox the Teacher: Fox Amigurumi Pattern
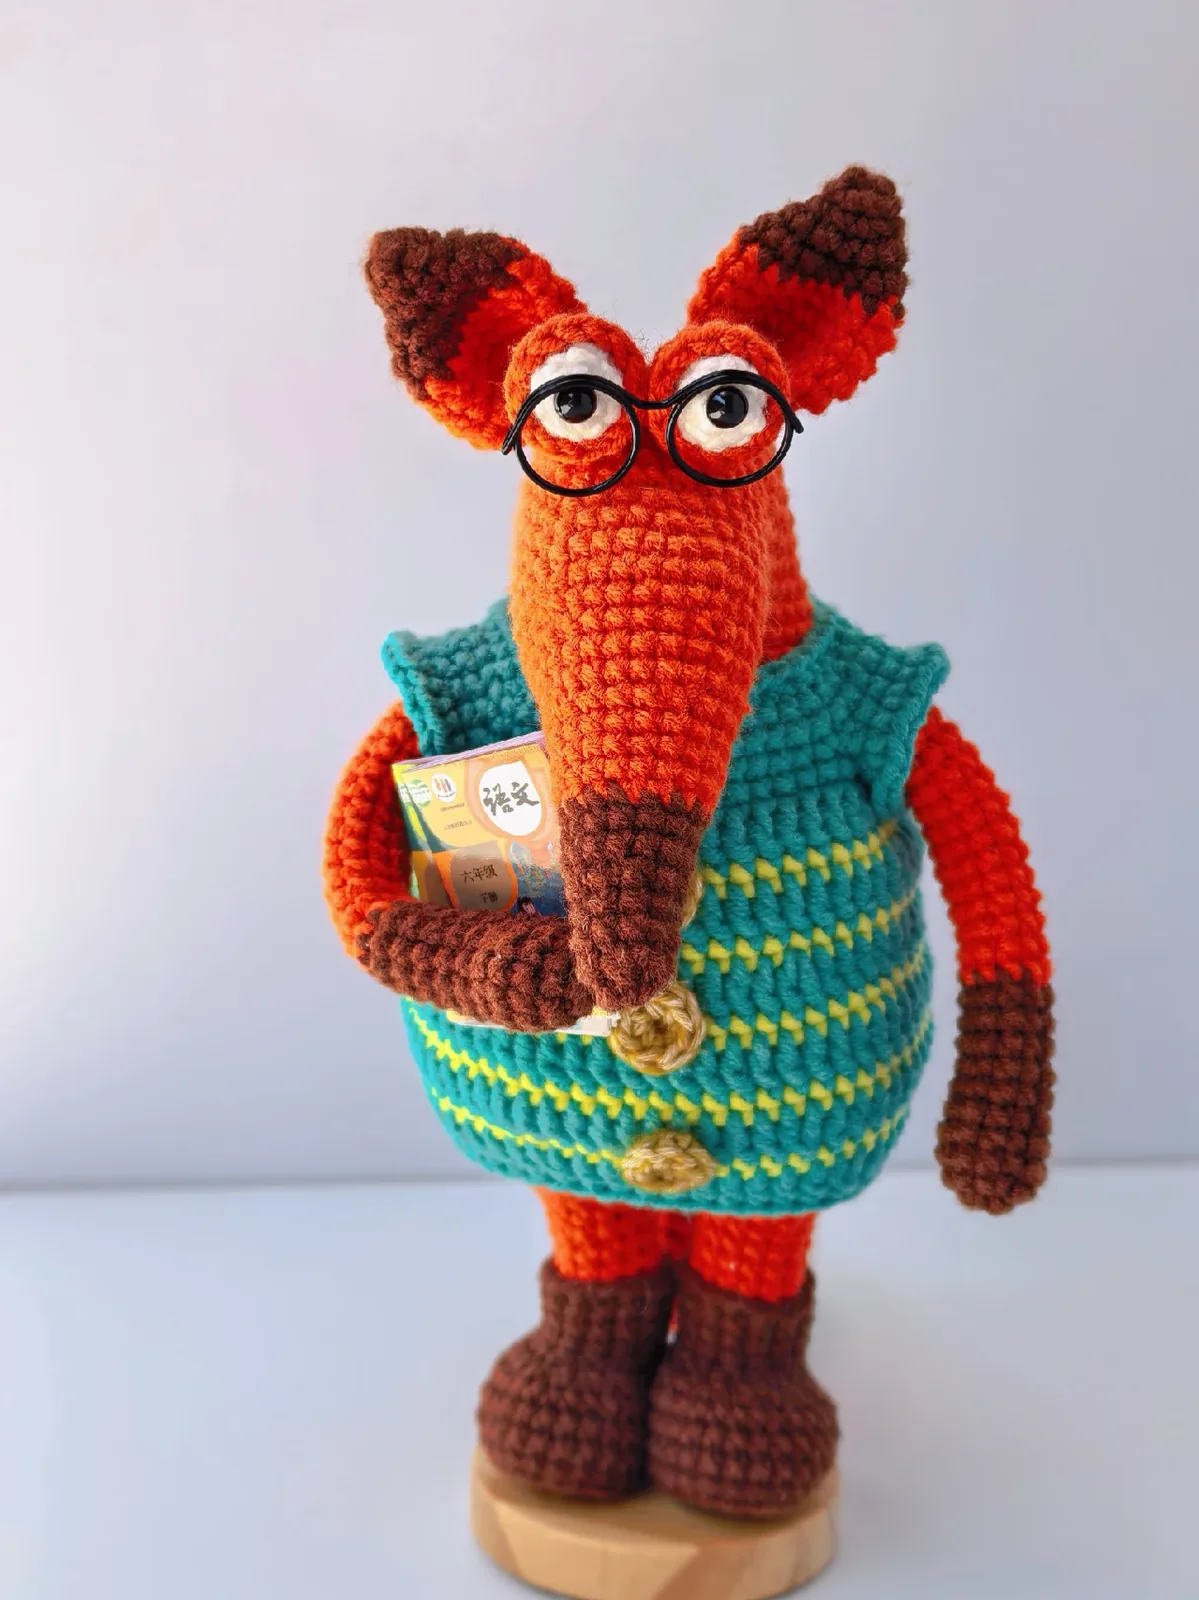
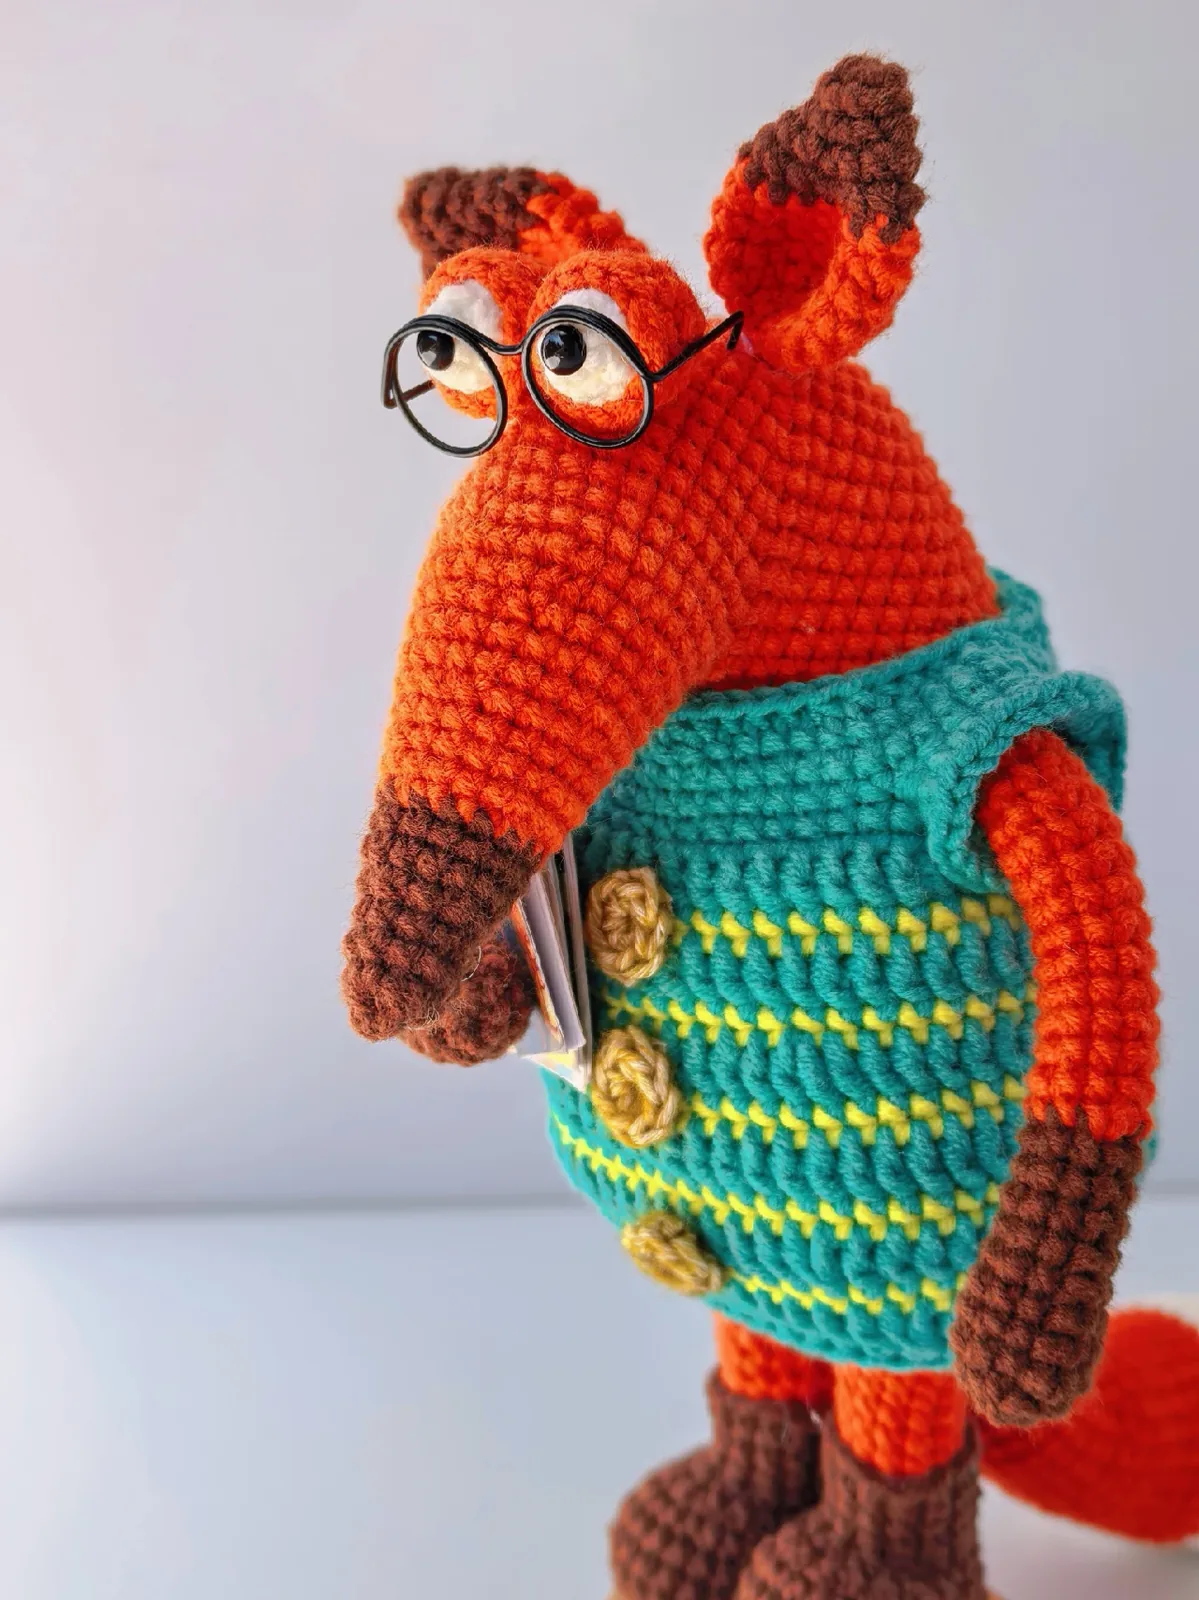
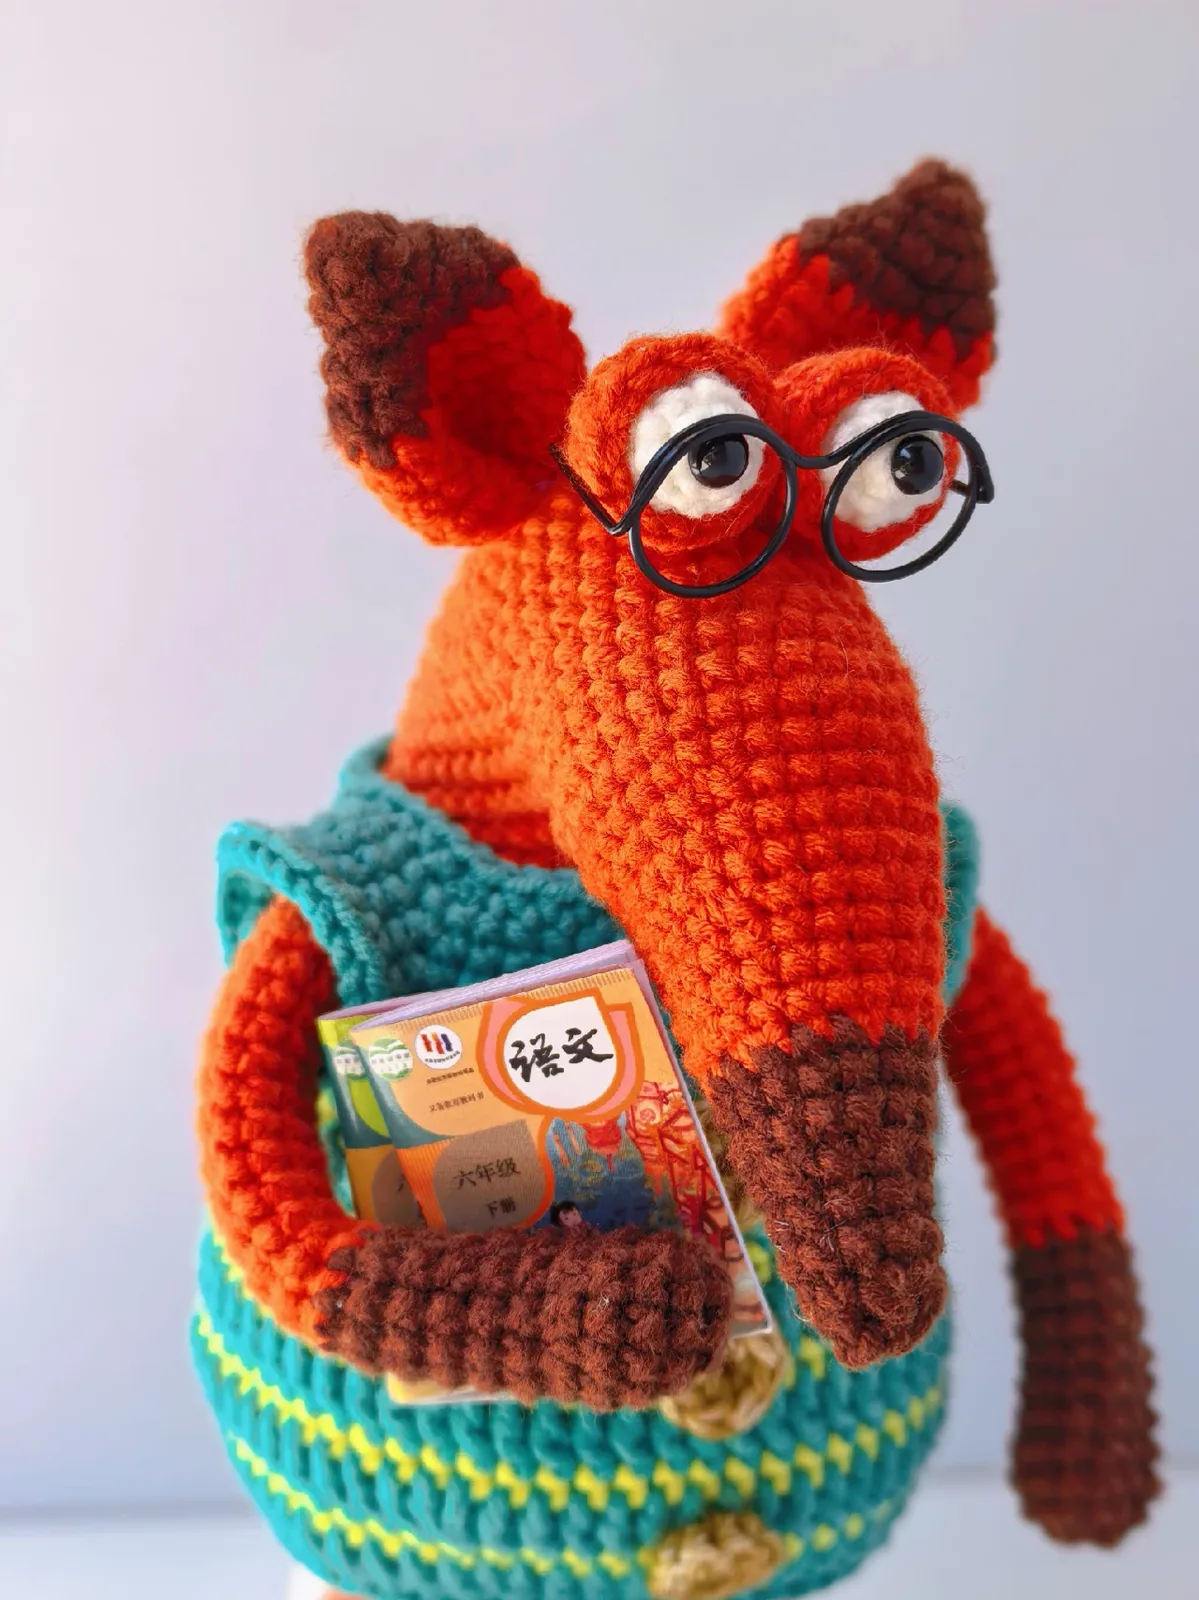
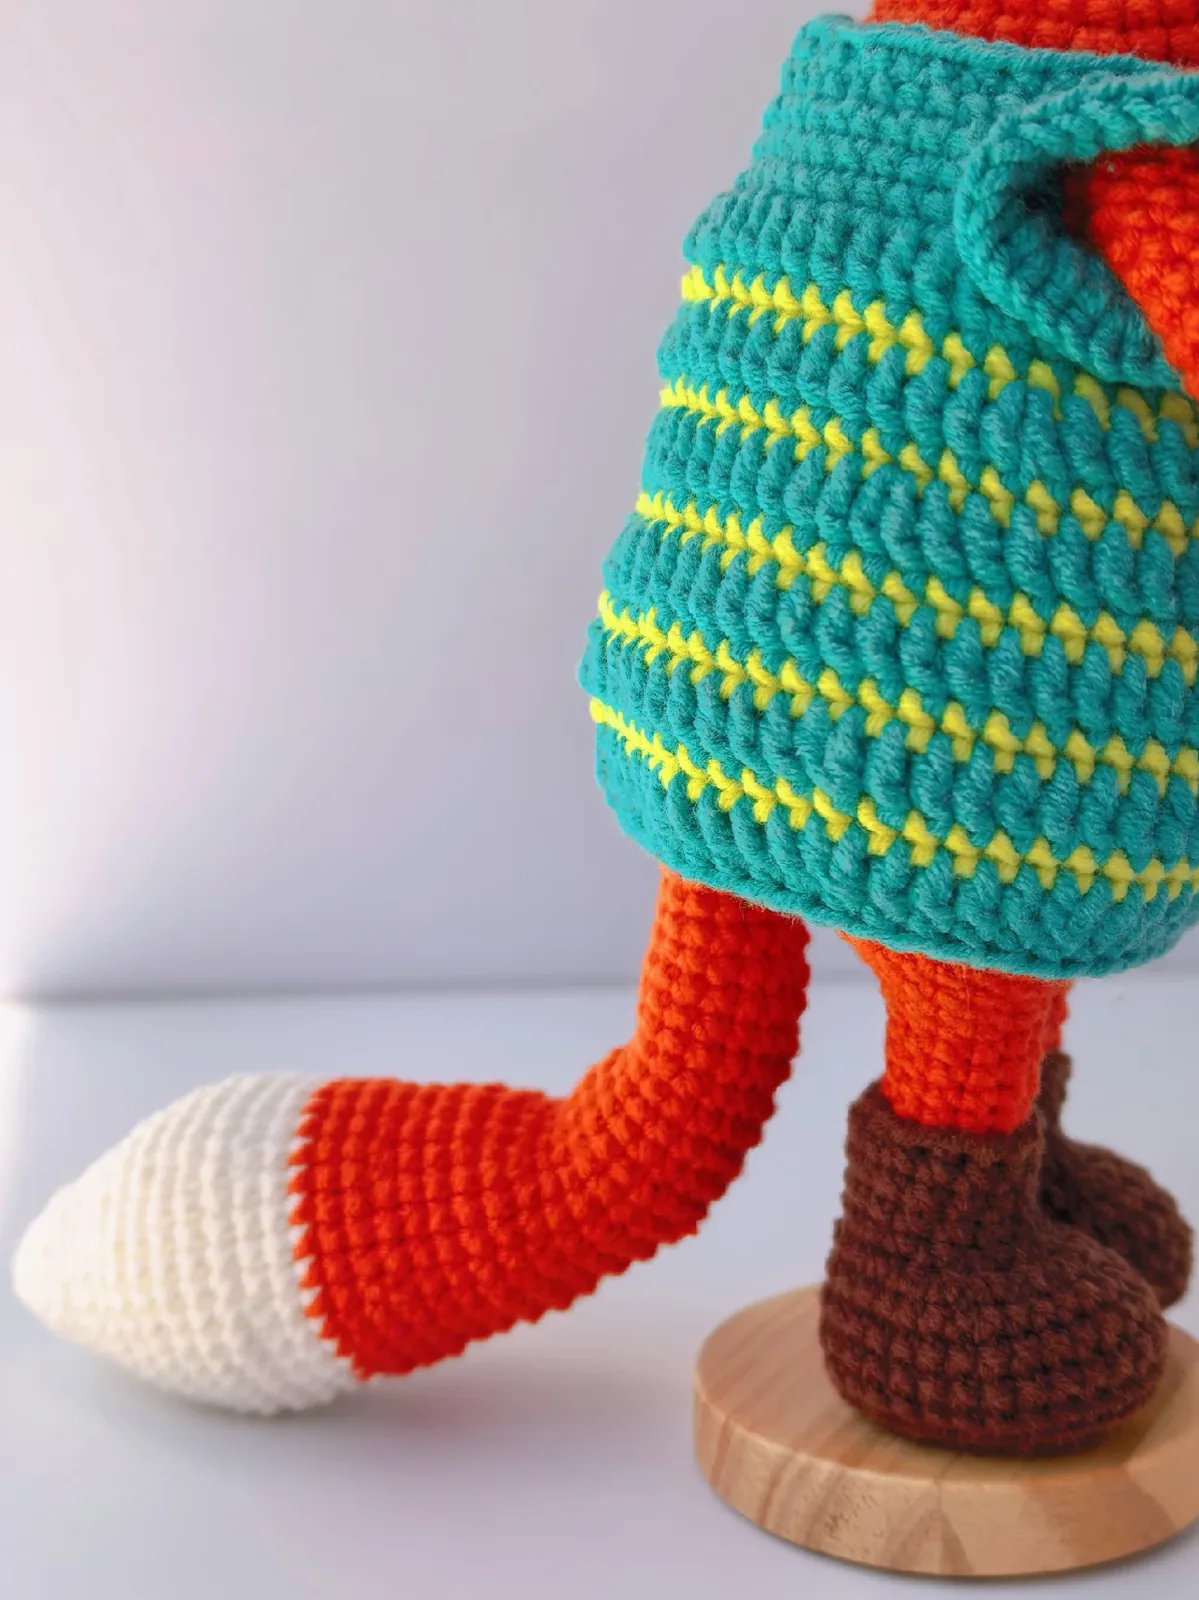
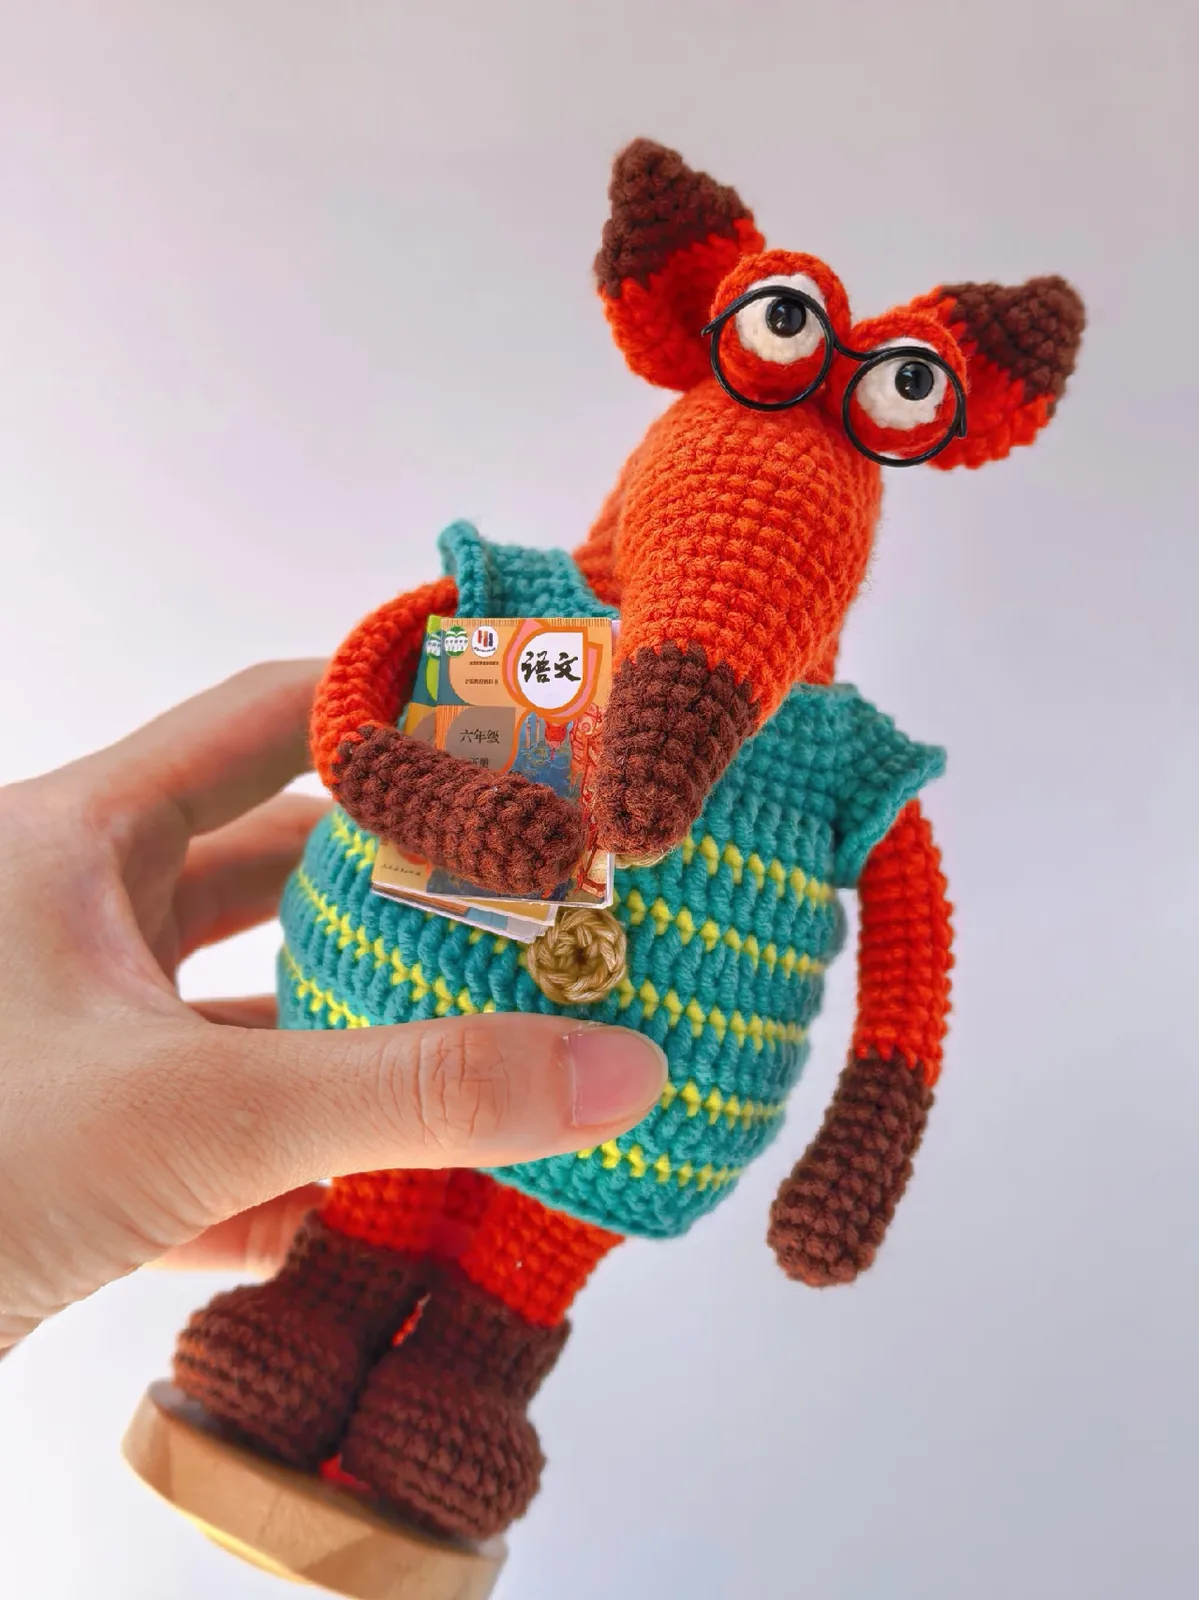
Mr. Fox the Teacher is a 17 cm standing fox: an orange head and body worked in one piece, with the legs and the long snout worked straight off it, big white eyes in orange eye sockets, dark brown boots, ear tips and hands, a white belly and a long tail with a white tip. It uses single crochet in the round, a few decreases and four bobble stitches for the fingers, with a 2.3 mm hook.
Shared on Loopy Panda with the designer's permission. Every round's stitch count is checked.
What you need
- Yarn in orange (head, body, legs, snout, eye sockets, ears, arms, tail), dark brown (snout tip, boots, ear tips, hands), white (eyeballs, belly, tail tip) and blue (scarf, optional); a thin yarn that suits a 2.3 mm hook
- Crochet hook: 2.3 mm (the designer's size)
- Two 5 mm black safety eyes
- Optional, as in the photos: small round wire doll glasses, a small wooden stand
- Fibre stuffing, stitch markers, pins and a tapestry needle
- Finished size: about 17 cm (6.7 in) tall with a 2.3 mm hook
Abbreviations (US terms)
Worked in a continuous spiral: don't join the rounds; move a stitch marker up every round. The head, body and legs are one piece; the snout is worked last from the stitches left on the head.
| Abbreviation | Chinese pattern | Meaning |
|---|---|---|
| ch | CH | chain |
| sc | X | single crochet |
| inc | V | 2 sc in the same stitch |
| dec | A | 2 sc together (invisible decrease) |
| 3 sc in next st | W | 3 sc in the same stitch |
| bobble | 5F 枣形针 | 5-dc bobble: 5 unfinished double crochet in one stitch, closed together (bobble stitch) |
| BLO | 内半针 | back loop only |
| sl st | SL | slip stitch |
Head (orange)
- Rnd 1: 6 sc in a magic ring (6)
- Rnd 2: inc in each st around (12)
- Rnd 3: (sc, inc) x6 (18)
- Rnd 4: (sc 2, inc) x6 (24)
- Rnd 5: (sc 3, inc) x6 (30)
- Rnd 6: (sc 4, inc) x6 (36)
- Rnd 7: sc in each st around (36)
- Rnd 8: (sc 5, inc) x6 (42)
- Rnd 9: sc in each st around (42)
- Rnd 10: (sc 6, inc) x6 (48)
- Rnd 11: sc in each st around (48)
- Rnd 12: (sc 7, inc) x6 (54)
- Rnd 13: (sc 8, inc) x6 (60)
- Rnd 14: (sc 9, inc) x6 (66)
- Rnd 15: (sc 10, inc) x6 (72)
- Count 42 stitches from the end of Rnd 15 and place a marker: these 42 make the body. The other 30 stay unworked for the snout, which you crochet last.
Body (orange, worked on from the head)
- Work only the 42 marked stitches and carry on in a spiral.
- Rnd 16: (sc 6, inc) x6 (48)
- Rnd 17–18: sc in each st around (48)
- Rnd 19: (sc 7, inc) x6 (54)
- Rnd 20–21: sc in each st around (54)
- Rnd 22: (sc 8, inc) x6 (60)
- Rnd 23–24: sc in each st around (60)
- Rnd 25: (sc 8, dec) x6 (54)
- Rnd 26–30: sc in each st around (54)
- Rnd 31: (sc 7, dec) x6 (48)
- Rnd 32–39: sc in each st around (48)
- Rnd 40: (sc 6, dec) x6 (42)
- Rnd 41: (sc 5, dec) x6 (36)
- Rnd 42: (sc 4, dec) x6 (30)
- Stuff the body, not too firmly. The 30 stitches of Rnd 42 make the legs: 12 for each leg, with 3 stitches between the legs at the front and 3 at the back. Line up the 3 front stitches with the middle of the doll.
Right leg (orange)
- Carry on from the end of Rnd 42 and work the next 12 stitches in a round.
- Rnd 43: sc 12 (12)
- Rnd 44–49: sc in each st around (12)
- Rnd 50: dec 6 (6)
- Rnd 51: BLO sc in each st around (6). Leave a tail for sewing.
Left leg (orange)
- Skip the 3 stitches between the legs and join the yarn in the 4th stitch. Work the other 12 stitches in a round, the same as the right leg.
- Rnd 43: sc 12 (12)
- Rnd 44–49: sc in each st around (12)
- Rnd 50: dec 6 (6)
- Rnd 51: BLO sc in each st around (6). Sew the 3 stitches between the legs together, front to back.
Snout (orange, then dark brown)
- Join the yarn on the 30 stitches left on Rnd 15 of the head.
- Rnd 1: sc 30 (30)
- Rnd 2: sc in each st around (30)
- Rnd 3: (sc 4, dec) x5 (25)
- Rnd 4–5: sc in each st around (25)
- Rnd 6: (sc 3, dec) x5 (20)
- Rnd 7–8: sc in each st around (20). Change to dark brown.
- Rnd 9: (sc 2, dec) x5 (15)
- Rnd 10–11: sc in each st around (15)
- Rnd 12: (sc, dec) x5 (10)
- Rnd 13–14: sc in each st around (10)
- Rnd 15: dec 5 (5). Stuff the head and the snout so the snout curves out a little, then close the end.
Eyeballs (white, make 2)
- Rnd 1: 6 sc in a magic ring (6)
- Rnd 2: (sc, inc) x3 (9)
- Rnd 3: sc in each st around (9)
- Rnd 4: (sc, dec) x3 (6). Fit a 5 mm safety eye in the middle as the pupil.
Eye sockets (orange, make 2)
- Rnd 1: 6 sc in a magic ring (6)
- Rnd 2: inc in each st around (12)
- Rnd 3–5: sc in each st around (12). Push an eyeball into each socket.
Belly (white)
- Rnd 1: 6 sc in a magic ring (6)
- Rnd 2: (sc, 3 sc in next st) x3 (12)
- Rnd 3: sc 2, 3 sc in next st, (sc 3, 3 sc in next st) x2, sc (18)
- Rnd 4: sc 3, 3 sc in next st, (sc 5, 3 sc in next st) x2, sc 2 (24)
- Rnd 5: sc 4, 3 sc in next st, (sc 7, 3 sc in next st) x2, sc 3 (30)
- Rnd 6: sc 5, 3 sc in next st, (sc 9, 3 sc in next st) x2, sc 4 (36)
- Rnd 7: sc 6, 3 sc in next st, (sc 11, 3 sc in next st) x2, sc 5 (42)
- Rnd 8: sc 7, 3 sc in next st, (sc 13, 3 sc in next st) x2, sc 6 (48)
Tail (white, then orange)
- Rnd 1: 6 sc in a magic ring (6)
- Rnd 2: (sc, inc) x3 (9)
- Rnd 3: (sc 2, inc) x3 (12)
- Rnd 4: (sc, inc) x6 (18)
- Rnd 5: sc in each st around (18)
- Rnd 6: (sc 2, inc) x6 (24)
- Rnd 7: sc in each st around (24)
- Rnd 8: (sc 3, inc) x6 (30)
- Rnd 9: sc in each st around (30)
- Rnd 10: (sc 4, inc) x6 (36)
- Rnd 11–13: sc in each st around (36)
- Rnd 14: (sc 4, dec) x6 (30)
- Rnd 15: sc in each st around (30). Change to orange.
- Rnd 16–18: sc in each st around (30)
- Rnd 19: (sc 3, dec) x6 (24)
- Rnd 20–23: sc in each st around (24)
- Rnd 24: (sc 2, dec) x6 (18)
- Rnd 25–29: sc in each st around (18)
- Rnd 30: sc 16, dec (17)
- Rnd 31: sc in each st around (17)
- Rnd 32: sc 15, dec (16)
- Rnd 33: sc in each st around (16)
- Rnd 34: sc 14, dec (15)
- Rnd 35: sc in each st around (15)
- Rnd 36: sc 13, dec (14)
- Rnd 37: sc in each st around (14)
- Rnd 38: sc 12, dec (13)
- Rnd 39: sc in each st around (13)
- Rnd 40: sc 11, dec (12)
- Rnd 41: sc in each st around (12)
- Rnd 42: sc 10, dec (11)
- Rnd 43: sc in each st around (11)
- Rnd 44: sc 9, dec (10)
- Stuff the tail lightly, flatten the opening and sc 5 through both layers to close it.
Boots (dark brown, make 2)
- Foundation: Ch 6
- Rnd 1: inc in 2nd ch from hook, sc in next 3 ch, 4 sc in last ch, working along the other side of the chain, sc in next 3 ch, 2 sc in last ch (14)
- Rnd 2: inc 2, sc 3, inc 4, sc 3, inc 2 (22)
- Rnd 3: inc, sc, inc, sc 6, inc, sc, inc, sc, inc, sc 6, inc, sc (28)
- Rnd 4: BLO sc in each st around (28)
- Rnd 5–7: sc in each st around (28)
- Rnd 8: sc 6, dec 9, sc 4 (19)
- Rnd 9: sc 5, dec 5, sc 4 (14)
- Rnd 10–12: sc in each st around (14)
- Finish with a round of slip stitches (14 sl st) for a neat edge and fasten off.
Ears (dark brown, then orange, make 2)
- Rnd 1: 4 sc in a magic ring (4)
- Rnd 2: (sc, inc) x2 (6)
- Rnd 3: (sc, inc) x3 (9)
- Rnd 4: (sc 2, inc) x3 (12)
- Rnd 5: (sc, inc) x6 (18). Change to orange.
- Rnd 6–7: sc in each st around (18)
- Rnd 8: (sc 2, inc) x6 (24)
- Rnd 9: sc in each st around (24)
- Rnd 10: (sc 2, dec) x6 (18)
- Rnd 11: dec 9 (9)
- Don't stuff. Flatten the ear, fold the bottom in half and work 2 sc through the matching stitches to hold the fold. Leave a tail for sewing.
Arms (dark brown, then orange, make 2)
- Foundation: Ch 4
- Rnd 1: inc in 2nd ch from hook, sc in next ch, 4 sc in last ch, working along the other side of the chain, sc in next ch, 2 sc in last ch (10)
- Rnd 2: (sc, bobble) in next st, sc, bobble, (sc, bobble) in next st, inc, sc 4, inc (14). The three bobbles are the fingers.
- Rnd 3: (sc 5, dec) x2 (12)
- Rnd 4: sc 3, bobble, bobble, sc 7 (12)
- Rnd 5: sc 2, dec, sc 6, dec (10)
- Rnd 6–10: sc in each st around (10). Change to orange.
- Rnd 11–24: sc in each st around (10)
- Rnd 25: sc 3, dec, sc 3, dec (8)
- Don't stuff. Flatten the opening and sc 4 through both layers to close it.
Scarf (blue, optional)
Not worn in the photos; a long, thin scarf for colder days.
- Row 1: ch 191, sc in 2nd ch from hook and in each ch across, ch 1, turn (190)
- Row 2: sc in each st across (190)
Assembly
- BootsSew a boot firmly onto each leg, leaving a little room at the tip of the leg. Sew the back loops of the boot's top round to the front loops of the leg's last round (see sewing amigurumi parts).
- TailPin the tail in the middle of the back, between Rnd 37 and Rnd 38 of the body, and sew it on once you like the position.
- ArmsSew the arms on both sides of the body at Rnd 16–17.
- BellyPin the belly on the front of the body, pull it smooth and sew it on, with its lower edge level with Rnd 39 of the body.
- EyesSew the eye sockets onto the head between Rnd 11 and Rnd 14, side by side above the snout.
- EarsSew the ears onto the head at Rnd 6–8, 8 stitches apart.
Chart symbols on this page
Frequently asked questions
Who designed Mr. Fox the Teacher?
叁叶钩编, a friend of our maker. She let us share the pattern on Loopy Panda and translate it; the round counts were checked and the few slips in the original corrected.
What hook and size?
A 2.3 mm hook gives a fox about 17 cm tall. A thicker yarn and a bigger hook make a bigger fox; the stitch counts stay the same.
Is the striped vest part of the pattern?
No. The teal vest with yellow stripes, the buttons, the glasses and the little book in the photos are extras. The pattern makes the fox underneath: an orange body with a white belly.
Which parts are stuffed?
The head, body, legs, snout, eyeballs and tail (lightly). The ears and arms are not stuffed.
Tell me when new free patterns are out
We'll send you a short email when a new free pattern or tutorial goes up. No spam.
Thank you! You're on the list. We'll email you when a new free pattern is out.
Please enter a valid email address.
Please tick the box to agree to receive our emails.
Too many tries. Please wait a few minutes and try again.
Something went wrong. Please try again later.
New short videos every week, too, on YouTube