 Loopy Panda
Bunny in a Frog Hat: Bunny Amigurumi Pattern
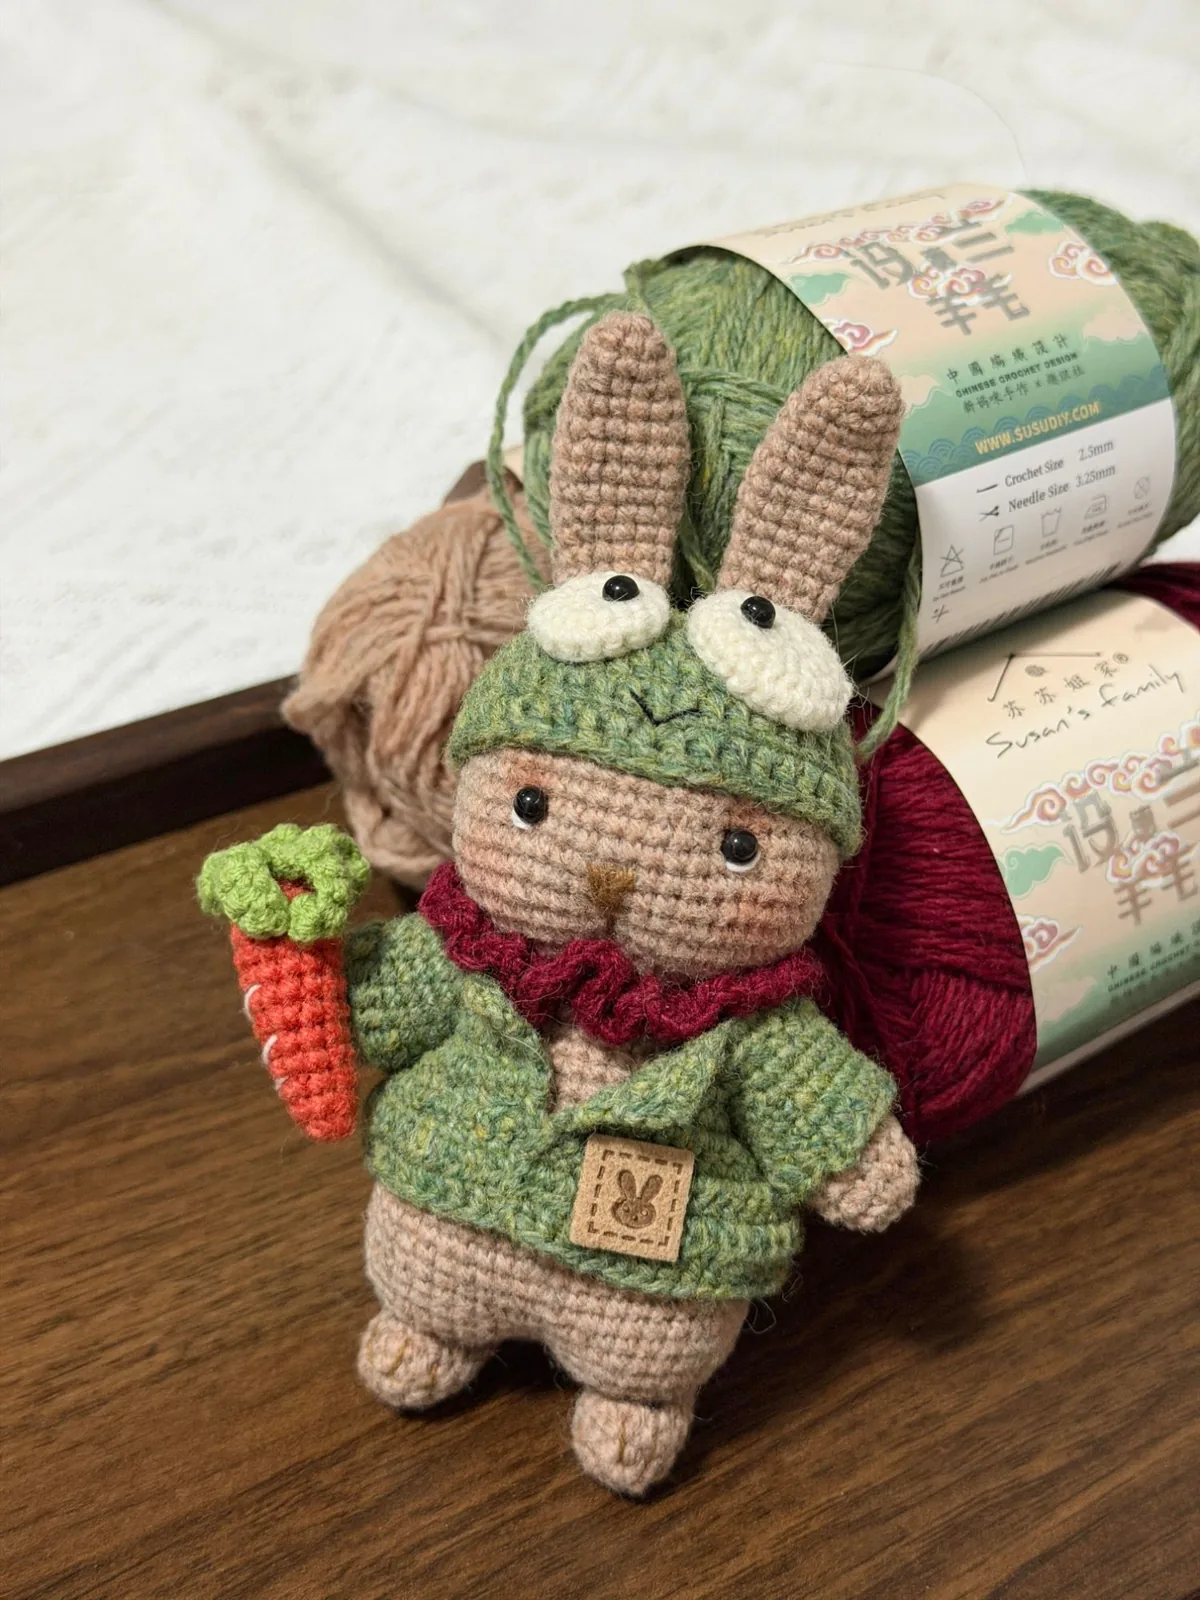
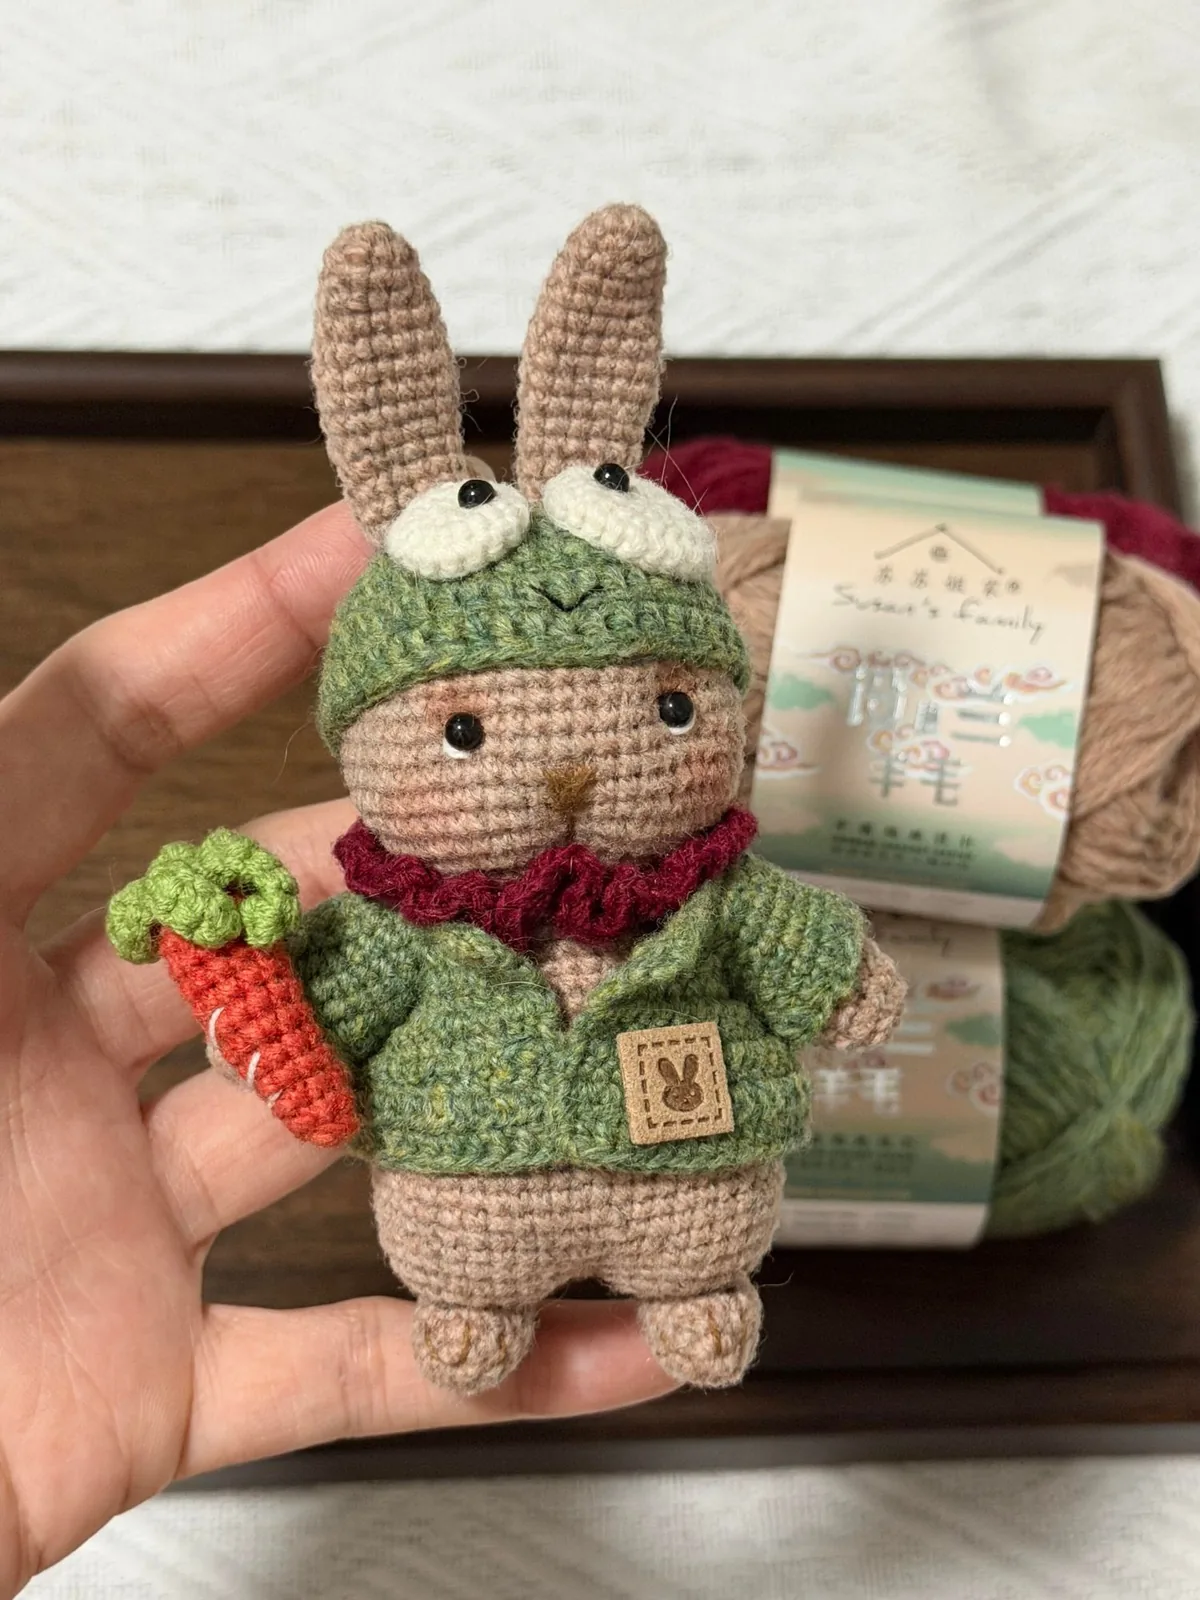
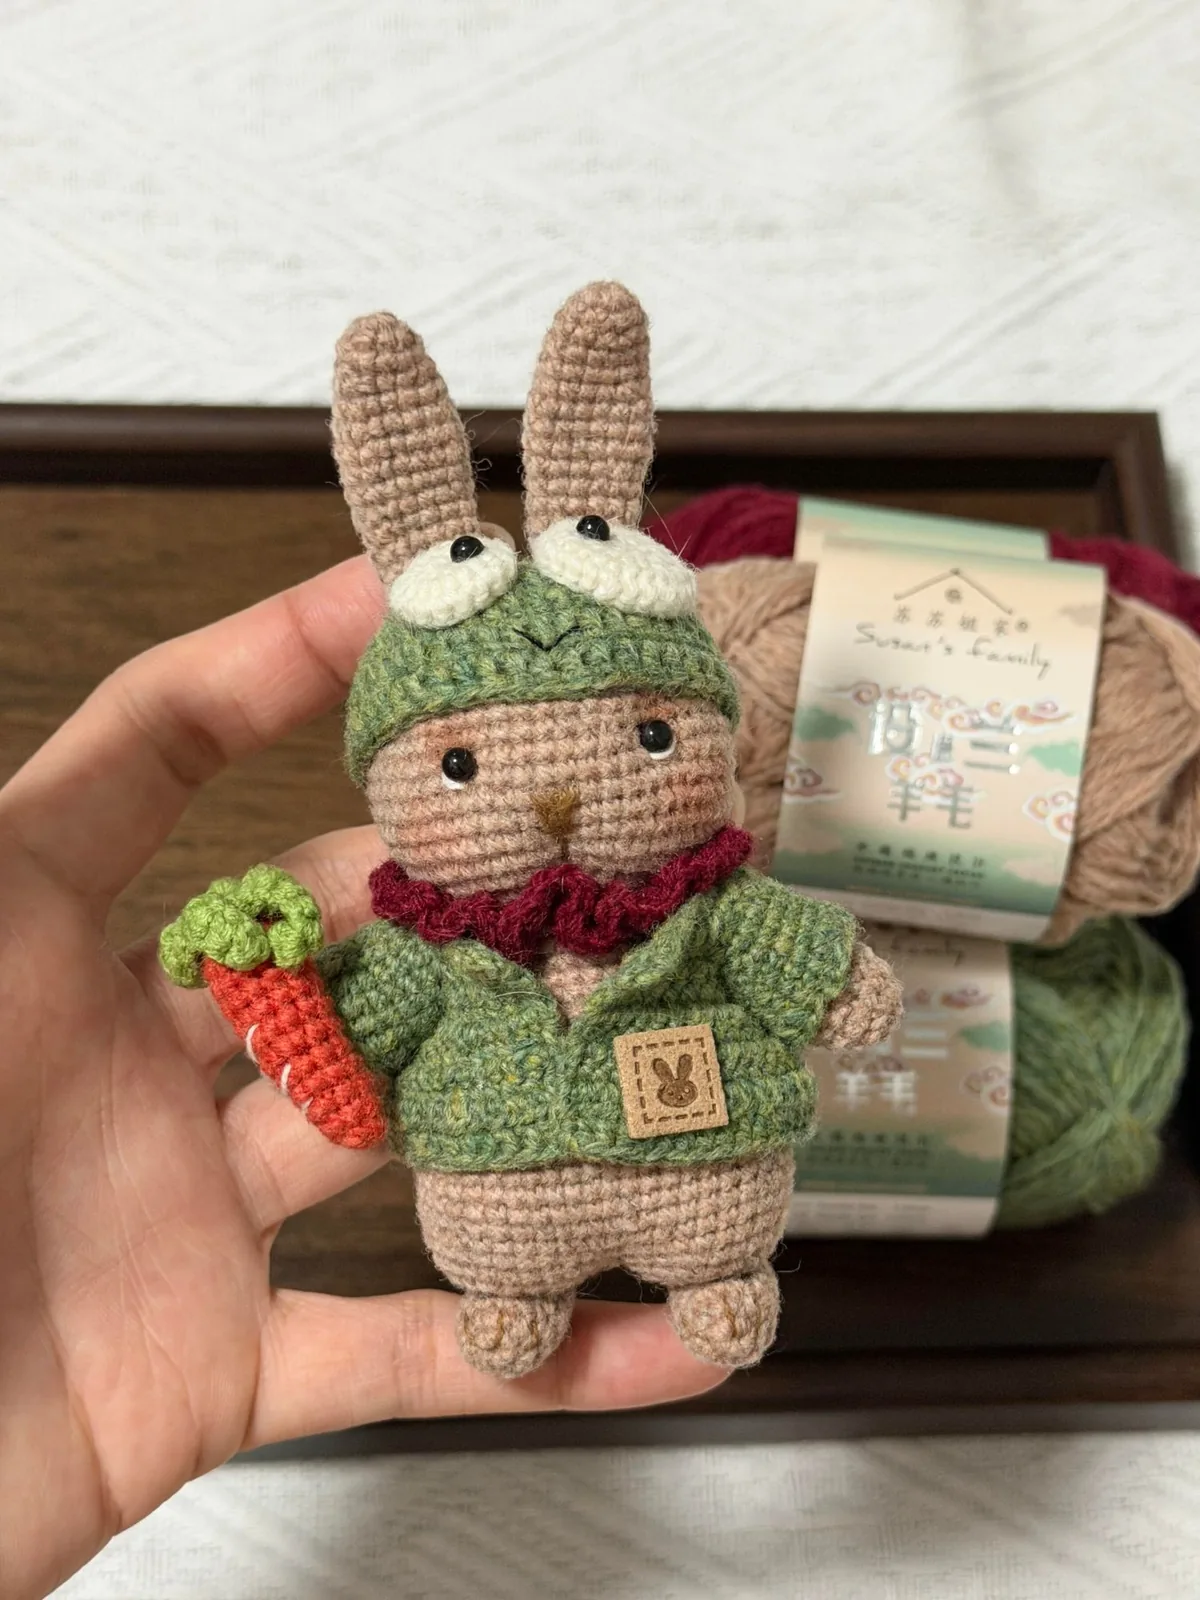
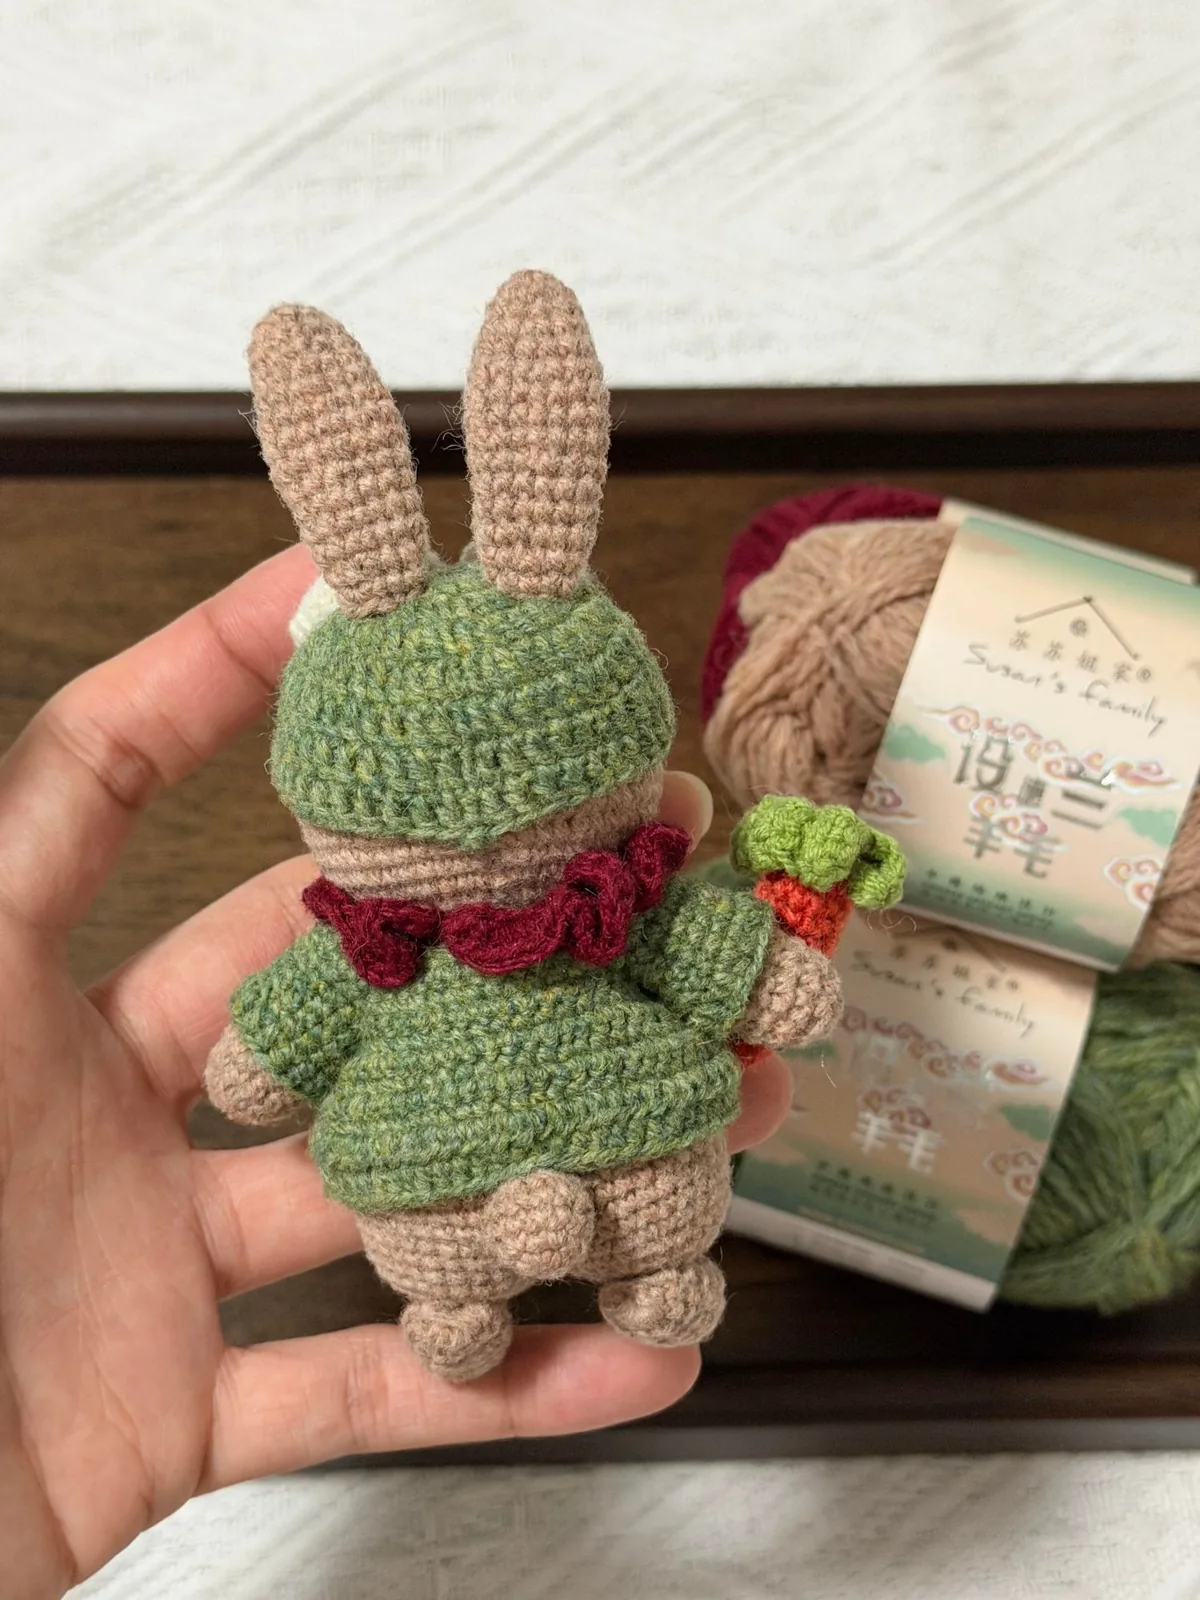
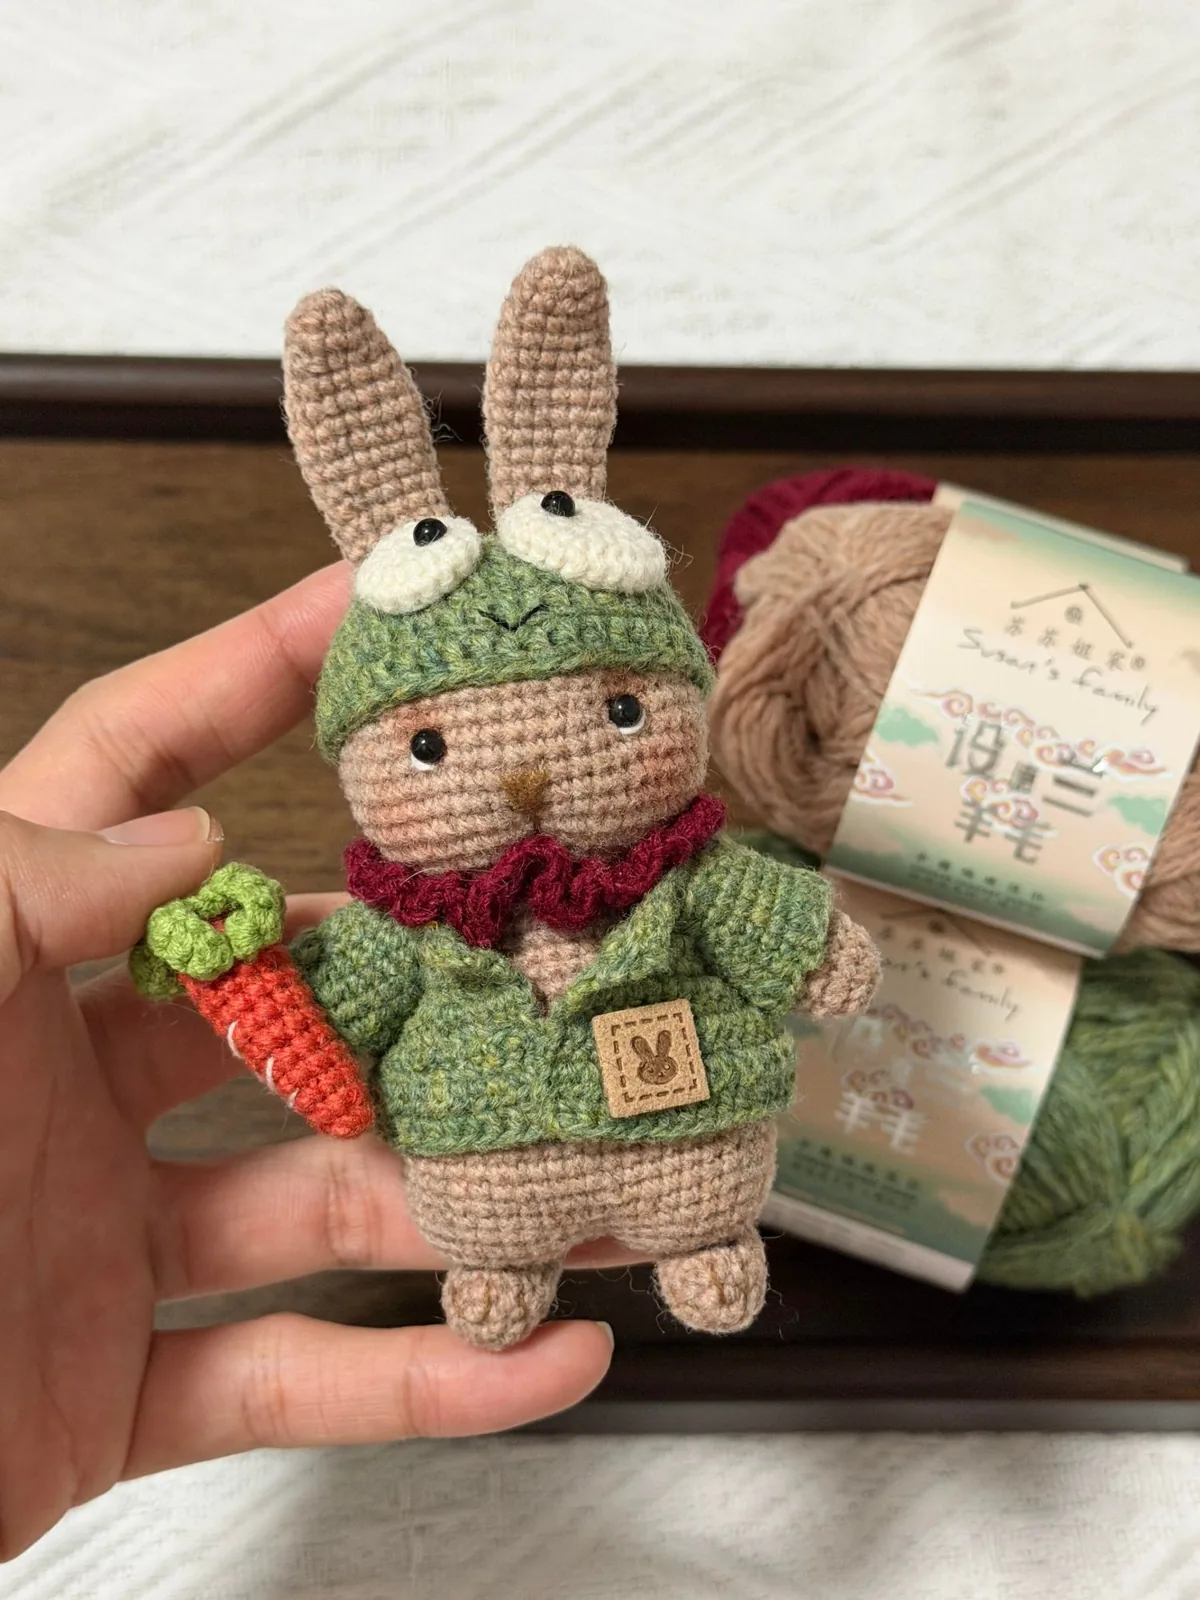
A 10 cm light brown bunny with long ears, wearing a green frog hat with big eyes, a green jacket and a burgundy ruffled scarf, and holding a carrot. The legs and body are one piece, the head is made separately and sewn on, the jacket is worked flat from the neck down with sleeves picked up at the armholes, and the hat is double crochet. A 2.5 mm hook.
Shared on Loopy Panda with the designer's permission. Every round's stitch count is checked.
What you need
- Yarn in light brown (body, head, arms, feet, ears, tail), green (hat, jacket), cream (frog eyes), burgundy (scarf), orange (carrot) and light green (carrot leaves); a fine wool that suits a 2.5 mm hook (the designer used a Shetland wool)
- Crochet hook: 2.5 mm (the designer's size)
- Two small black safety eyes for the bunny and two tiny black eyes or beads for the frog hat
- Brown yarn for the nose, a little white yarn for the lines under the eyes; optional: blush, two small buttons, a small leather patch for the jacket
- Fibre stuffing, stitch markers, pins, craft glue and a tapestry needle
- Finished size: about 10 cm (4 in) tall with a 2.5 mm hook
Abbreviations (US terms)
Parts in the round are worked in a continuous spiral: don't join the rounds; move a stitch marker up every round. The number in brackets is the stitch count at the end of the round or row.
| Abbreviation | Chinese pattern | Meaning |
|---|---|---|
| ch | CH | chain |
| sc | X | single crochet |
| inc | V | 2 sc in the same stitch |
| dec | A | 2 sc together (invisible decrease) |
| hdc | T | half double crochet |
| dc | F | double crochet |
| 2 dc in next st | FV | 2 double crochet in the same stitch |
| sl st | SL | slip stitch |
Legs and body (light brown)
- Make 2 legs (Rnd 1–4). Fasten off the first leg; keep the second one on the hook.
- Rnd 1: 6 sc in a magic ring (6)
- Rnd 2: inc in each st around (12)
- Rnd 3: (sc, inc) x6 (18)
- Rnd 4: (sc 2, inc) x6 (24)
- Rnd 5: join the legs: sc 24 around the first leg, sc 24 around the second leg (48)
- Rnds 6–12: sc in each st around (48)
- Rnd 13: (sc 6, dec) x6 (42)
- Rnd 14: sc in each st around (42)
- The decreases in Rnd 15–17 and 20–22 take away 1 stitch at each side of the body: keep the two decreases in line with each other (one under each arm).
- Rnd 15: (sc 19, dec) x2 (40)
- Rnd 16: (sc 18, dec) x2 (38)
- Rnd 17: (sc 17, dec) x2 (36)
- Rnds 18–19: sc in each st around (36)
- Rnd 20: (sc 16, dec) x2 (34)
- Rnd 21: (sc 15, dec) x2 (32)
- Rnd 22: (sc 14, dec) x2 (30)
- Rnds 23–24: sc in each st around (30)
- Rnd 25: (sc 3, dec) x6 (24)
- Rnd 26: sc in each st around (24)
- Rnd 27: (sc, dec, sc) x6 (18). Stuff the legs and body firmly. Leave a long tail for sewing.
Head (light brown)
- Rnd 1: 6 sc in a magic ring (6)
- Rnd 2: inc in each st around (12)
- Rnd 3: (sc, inc) x6 (18)
- Rnd 4: (sc 2, inc) x6 (24)
- Rnd 5: (sc 3, inc) x6 (30)
- Rnd 6: (sc 4, inc) x6 (36)
- Rnd 7: sc in each st around (36)
- Rnd 8: (sc 5, inc) x6 (42)
- Rnds 9–10: sc in each st around (42)
- Rnd 11: (sc 6, inc) x6 (48)
- Rnds 12–13: sc in each st around (48)
- Rnd 14: (sc 7, inc) x6 (54)
- Rnds 15–19: sc in each st around (54)
- Rnd 20: (sc 7, dec) x6 (48)
- Rnd 21: sc in each st around (48)
- Fit the safety eyes now (see the assembly) and stuff the head firmly: Rnd 22 pulls the base in flat in one round.
- Rnd 22: dec x24 (24)
- Rnd 23: (sc, dec, sc) x6 (18). Add a little more stuffing and leave a long tail for sewing.
Arms (light brown, make 2)
- Rnd 1: 6 sc in a magic ring (6)
- Rnd 2: inc in each st around (12)
- Rnds 3–12: sc in each st around (12). Stuff the hand lightly; leave a tail for sewing.
Feet (light brown, make 2)
- Rnd 1: 6 sc in a magic ring (6)
- Rnd 2: inc in each st around (12)
- Rnds 3–8: sc in each st around (12). Stuff lightly; leave a tail for sewing.
Ears (light brown, make 2)
- Rnd 1: 6 sc in a magic ring (6)
- Rnd 2: (sc, inc) x3 (9)
- Rnd 3: sc in each st around (9)
- Rnd 4: (sc 2, inc) x3 (12)
- Rnd 5: sc in each st around (12)
- Rnd 6: (sc 3, inc) x3 (15)
- Rnds 7–9: sc in each st around (15)
- Rnd 10: (sc 3, dec) x3 (12)
- Rnds 11–13: sc in each st around (12)
- Rnd 14: (sc 2, dec) x3 (9)
- Rnd 15: sc in each st around (9). Don't stuff; flatten the ear and leave a tail for sewing.
Tail (light brown)
- Rnd 1: 6 sc in a magic ring (6)
- Rnd 2: inc in each st around (12)
- Rnds 3–4: sc in each st around (12)
- Rnd 5: dec x6 (6). Stuff a little and close.
Frog hat (green)
- Rnd 1: 12 dc in a magic ring (12)
- Rnd 2: 2 dc in each st around (24)
- Rnd 3: (dc, 2 dc in next st) x12 (36)
- Rnd 4: (dc, 2 dc in next st, dc) x12 (48)
- Rnds 5–6: dc in each st around (48). Fasten off and weave in the ends. Embroider a small frog mouth on the front in dark green or black yarn.
Frog eyes (cream)
- Eye base (make 2):
- Rnd 1: 8 sc in a magic ring (8)
- Rnd 2: inc in each st around (16)
- Rnd 3: (sc, inc) x8 (24)
- Rnd 4: sc in each st around (24). Fasten off.
- Eye top (make 2):
- Rnd 1: 8 sc in a magic ring (8)
- Rnd 2: inc in each st around (16)
- Rnd 3: sc in each st around (16). Fasten off; glue the tiny black eye in the middle.
Jacket (green)
- Worked flat, from the neck down. Chain 1 at the end of every row and turn (the turning chain isn't a stitch).
- Row 1: ch 44; starting in the 2nd ch from the hook, sc 43 (43)
- Row 2: sc in each st across (43)
- Row 3: sc 7, ch 8, skip 8 sts, sc 14, ch 8, skip 8 sts, sc 3, ch 2, skip 2 sts, sc (43) (the two chains of 8 are the armholes, the chain of 2 is a buttonhole)
- Row 4: sc 9, inc 2, sc 20, inc 2, sc 10 (47)
- Row 5: sc in each st across (47)
- Row 6: sc 2, (sc 3, inc, sc 3) x6, sc 3 (53)
- Row 7: sc 50, ch 2, skip 2 sts, sc (53) (second buttonhole)
- Row 8: sc 2, (sc 7, inc) x6, sc 3 (59)
- Row 9: sc in each st across (59)
- Rows 10–11: hdc in each st across (59). Fasten off.
- Sleeves (make 2): join the yarn at an armhole and work in the round.
- Rnd 1: 18 sc evenly around the armhole (18)
- Rnds 2–5: sc in each st around (18)
- Rnd 6: hdc in each st around (18). Fasten off.
Carrot (orange) and leaves (light green)
- Rnd 1: 6 sc in a magic ring (6)
- Rnd 2: sc in each st around (6)
- Rnd 3: (sc, inc) x3 (9)
- Rnds 4–5: sc in each st around (9)
- Rnd 6: (sc, inc, sc) x3 (12)
- Rnds 7–12: sc in each st around (12)
- Stuff the carrot lightly.
- Rnd 13: dec x6 (6). Close and fasten off.
- Leaves (light green): make a magic ring; *ch 7, starting in the 2nd ch from the hook sc 6 back down the chain, sl st into the ring*; repeat from * to * 6 times (6 leaves). Pull the ring closed and sew the leaves onto the top of the carrot.
Ruffled scarf (burgundy)
- Chain a length that goes once round the neck plus about 3 cm. Starting in the 4th ch from the hook, work 3 dc in each chain to the end; the scarf curls into a ruffle by itself. Fasten off.
Assembly
- Head to bodySew the head onto the body, the last 18 stitches of the head to the last 18 stitches of the body (see sewing amigurumi parts).
- FaceThe safety eyes go in before the head is closed, in the middle of the face with about 6 stitches between them (see safety eyes). Embroider a small brown nose between and below them, a short white line under each eye, and add a touch of blush if you like.
- EarsSew the flattened ears on top of the head, close together, so they stand up through the hat as in the photos.
- Arms and feetSew an arm on each side of the body just under the head. Sew the feet to the front of the legs at the bottom and embroider two short brown toe lines on each.
- TailSew the tail on low at the back of the body.
- Frog hatGlue each eye top, wrong side up, onto an eye base, then glue or sew the two frog eyes onto the front of the hat. Put the hat on the bunny with the ears coming out at the top and sew it in place with a few stitches.
- Jacket, scarf and carrotPut the jacket on, sew two small buttons opposite the buttonholes if you want to close it (in the photos it is worn open), and sew on the patch. Wrap the scarf round the neck and sew its ends together at the back. Sew the carrot to one hand.
Chart symbols on this page
Frequently asked questions
Who designed the bunny in a frog hat?
A crocheter friend of our maker, who let us share the pattern on Loopy Panda and translate it. We checked every round's stitch count, and filled in the few steps the original sheet left open (the tail rounds, where the side decreases go, the scarf and the carrot leaves) from its stitch counts and photos.
What hook and size?
A 2.5 mm hook with a fine wool gives a bunny about 10 cm tall. A thicker yarn and a bigger hook make a bigger bunny; the stitch counts stay the same.
Is it good for a beginner?
The bunny itself is all single crochet in the round, which is fine once you know increases and decreases. The jacket (worked flat, with armholes and buttonholes) and the double crochet hat take a little more practice; start with the beginner's amigurumi guide if they are new to you.
Tell me when new free patterns are out
We'll send you a short email when a new free pattern or tutorial goes up. No spam.
Thank you! You're on the list. We'll email you when a new free pattern is out.
Please enter a valid email address.
Please tick the box to agree to receive our emails.
Too many tries. Please wait a few minutes and try again.
Something went wrong. Please try again later.
New short videos every week, too, on YouTube